C/C++测试框架

框架

Head only

Compile

C 测试框架:

doctest

  • 轻量
  • 编译速度快(相比于 catch2)
  • API友好
  • 功能丰富,支持对模板批量测试

使用 CMake 配置时,确保编译的目标文件找得到 doctest 的头文件即可。

1
2
3
4
include_directories('path to doctest.h')

# 或者
target_include_directories(${target_name} PUBLIC 'path to doctest.h')

断言宏等级划分:

  • REQUIRE:这个等级算是最高的,如果断言失败,不仅会标记为测试不通过,而且会强制退出测试。
  • CHECK:如果断言失败,标记为测试不通过,但不会强制退出,会继续执行。
  • WARN:如果断言失败,不会标记为测试不通过,也不会强制退出,但是会给出对应的提示。
1
2
3
4
5
6
7
8
9
10
11
12
13
14
15
16
17
18
19
20
21
22
23
24
25
26
27
28
29
30
31
32
33
34
35
36
37
38
39
40
41
42
43
44
45
46
47
48
49
50
51
52
// build test subcases like a tree.
// run: 1--2--end 1--3--end two subroutines.
TEST_CASE("vectors can be sized and resized") {
std::vector<int> v(5);
// 1
REQUIRE(v.size() == 5);
REQUIRE(v.capacity() >= 5);

SUBCASE("adding to the vector increases it's size") {
// 2
v.push_back(1);

CHECK(v.size() == 6);
CHECK(v.capacity() >= 6);
}
SUBCASE("reserving increases just the capacity") {
// 3
v.reserve(6);

CHECK(v.size() == 5);
CHECK(v.capacity() >= 6);
}
}

// Group the test cases.
TEST_SUITE("math") {
TEST_CASE("") {} // part of the math test suite
}

// Test template.
TEST_CASE_TEMPLATE("test std::any as integer", T, char, short, int,
long long int) {
auto v = T();
std::any var = T();
CHECK(std::any_cast<T>(var) == v);
}

TEST_CASE_TEMPLATE("test std::any as string", T, const char *, std::string_view,
std::string) {
T v = "hello world";
std::any var = v;
CHECK(std::any_cast<T>(var) == v);
}


TEST_CASE("infos") {
REQUIRE("foobar" == doctest::Contains("foo"));
CHECK_MESSAGE(2 == 1, "not valid");
REQUIRE(22.0 / 7 ==
doctest::Approx(3.141).epsilon(0.01)); // allow for a 1% error
}

nanobench

nanobench

1
2
3
4
5
6
7
8
9
10
11
12
13
14
15
16
include(FetchContent)

FetchContent_Declare(
nanobench
GIT_REPOSITORY https://github.com/martinus/nanobench.git
GIT_TAG v4.1.0
GIT_SHALLOW TRUE)

FetchContent_MakeAvailable(nanobench)


...


# 目标文件链接
target_link_libraries(${target_name} PRIVATE nanobench)
1
2
3
4
5
6
7
8
9
10
#include <nanobench.h>
#include <atomic>

int main() {
int y = 0;
std::atomic<int> x(0);
ankerl::nanobench::Bench().run("compare_exchange_strong", [&] {
x.compare_exchange_strong(y, 0);
});
}

输出结果

ns/op op/s err% total benchmark
9.07 110,254,890.34 0.0% 0.00 compare_exchange_strong
  • ns/op:每个bench内容需要经历的时间(ns为单位)
  • op/s:每秒可以执行多少次操作
  • err%:运行多次测试的波动情况(误差)
  • ins/op:每次操作需要多少条指令
  • cyc/op:每次操作需要多少次时钟周期
  • bra/op:每次操作有多少次分支预判
  • miss%:分支预判的miss率
  • total:本次消耗的总时间
  • benchmark:"compare_exchange_strong" 自定义测试名称

可测 BigO 时间复杂度:

1
2
3
4
5
6
7
8
9
10
11
12
13
14
15
16
17
18
19
20
21
22
23
24
25
26
27
28
29
30
31
32
33
34
35
36
#define DOCTEST_CONFIG_IMPLEMENT_WITH_MAIN

#include <doctest.h>
#include <nanobench.h>
#include <iostream>
#include <atomic>
#include <set>

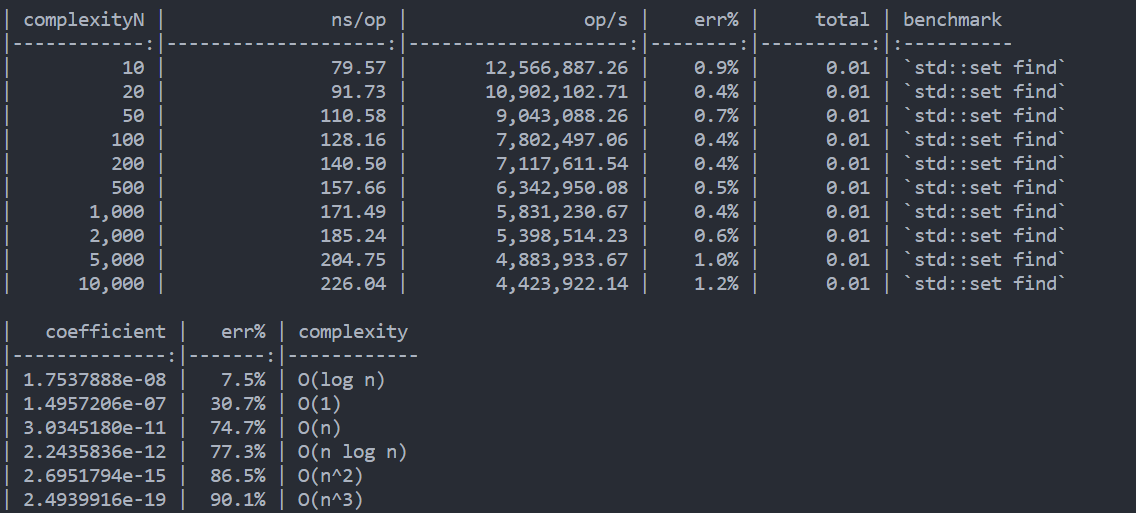
TEST_CASE("tutorial_complexity_set_find") {
// Create a single benchmark instance that is used in multiple benchmark
// runs, with different settings for complexityN.
ankerl::nanobench::Bench bench;

// a RNG to generate input data
ankerl::nanobench::Rng rng;

std::set<uint64_t> set;

// Running the benchmark multiple times, with different number of elements
for (auto setSize :
{10U, 20U, 50U, 100U, 200U, 500U, 1000U, 2000U, 5000U, 10000U}) {

// fill up the set with random data
while (set.size() < setSize) {
set.insert(rng());
}

// Run the benchmark, provide setSize as the scaling variable.
bench.complexityN(set.size()).run("std::set find", [&] {
ankerl::nanobench::doNotOptimizeAway(set.find(rng()));
});
}

// calculate BigO complexy best fit and print the results
std::cout << bench.complexityBigO() << std::endl;
}

可使用 pyperf 解析结果:

1
2
3
4
5
6
7
8
9
10
11
12
13
14
15
16
17
18
19
20
21
22
23
24
25
26
27
28
#define DOCTEST_CONFIG_IMPLEMENT_WITH_MAIN

#include <doctest.h>
#include <nanobench.h>
#include <algorithm>
#include <fstream>
#include <atomic>
#include <random>

TEST_CASE("shuffle_pyperf") {
std::vector<uint64_t> data(500, 0); // input data for shuffling

// NOLINTNEXTLINE(cert-msc32-c,cert-msc51-cpp)
std::default_random_engine defaultRng(123);
std::ofstream fout1("pyperf_shuffle_std.json");
ankerl::nanobench::Bench()
.epochs(100)
.run("std::shuffle with std::default_random_engine",
[&]() { std::shuffle(data.begin(), data.end(), defaultRng); })
.render(ankerl::nanobench::templates::pyperf(), fout1);

std::ofstream fout2("pyperf_shuffle_nanobench.json");
ankerl::nanobench::Rng rng(123);
ankerl::nanobench::Bench()
.epochs(100)
.run("ankerl::nanobench::Rng::shuffle", [&]() { rng.shuffle(data); })
.render(ankerl::nanobench::templates::pyperf(), fout2);
}
1
python3 -m pyperf stats pyperf_shuffle_std.json

cmocka

API文档。但是建议结合 source code 中的示例程序,了解 cmocka 的使用。

项目下新建文件夹 cmocka ,添加以下 .cmake 文件:

1
2
3
4
5
6
7
8
9
10
11
12
13
14
15
16
include(FetchContent)

FetchContent_Declare(
cmocka
GIT_REPOSITORY https://git.cryptomilk.org/projects/cmocka.git
GIT_TAG cmocka-1.1.7
GIT_SHALLOW 1
)

set(WITH_STATIC_LIB ON CACHE BOOL "CMocka: Build with a static library" FORCE)
set(WITH_CMOCKERY_SUPPORT OFF CACHE BOOL "CMocka: Install a cmockery header" FORCE)
set(WITH_EXAMPLES OFF CACHE BOOL "CMocka: Build examples" FORCE)
set(UNIT_TESTING ON CACHE BOOL "CMocka: Build with unit testing" FORCE)
set(PICKY_DEVELOPER OFF CACHE BOOL "CMocka: Build with picky developer flags" FORCE)

FetchContent_MakeAvailable(cmocka)

项目根目录下的 CMakeLists.txt 中:

1
2
3
4
5
6
7
8
9
include(cmake/FetchCMocka.cmake)

# 添加编译目标
add_executable(CMockaExample test.c)
target_compile_features(CMockaExample PRIVATE c_std_99)
target_link_libraries(CMockaExample PRIVATE cmocka-static)

enable_testing()
add_test(NAME CMockaExample COMMAND CMockaExample)
1
2
3
4
5
6
7
8
9
10
11
12
13
14
15
16
17
18
19
#include <stdarg.h>
#include <setjmp.h>
#include <stddef.h>
#include <cmocka.h>

static void test(void **state)
{
assert_int_equal(2, 2);
}

int main()
{
const struct CMUnitTest tests[] =
{
cmocka_unit_test(test),
};

return cmocka_run_group_tests(tests, NULL, NULL);
}


本博客所有文章除特别声明外,均采用 CC BY-SA 4.0 协议 ,转载请注明出处!