计算机科学中有两种思考方式:
底层思维:向下,把握机器底层从微观理解对象构造。
抽象思维:向上,将问题处理过程抽象为程序代码。
设计模式通过抽象,分离职责,提高复用性。
第一个示例 绘制点或者线,实现方式一,点是点,线是线。
1
2
3
4
5
6
7
8
9
10
11
12
13
14
15
16
17
18
19
20
21
22
23
24
25
26
27
class Point {class Line {class MainForm :public Form {private :vector <Line> lineVector;vector <Rect> rectVector;protected :virtual void OnMouseUp (const MouseEventArgs& e) virtual void OnPaint (const PaintEventArgs& e) void MainForm::OnMouseUp (const MouseEventArgs& e) void MainForm::OnPaint (const PaintEventArgs& e)
方式二,抽象出Shape基类,在MainForm中统一接口调用。
1
2
3
4
5
6
7
8
9
10
11
12
13
14
15
16
17
18
19
20
21
22
23
24
25
26
27
28
29
30
31
32
33
34
35
36
37
38
39
40
41
42
43
44
45
class Shape {public :virtual void Draw (const Graphics& g) 0 ;virtual ~Shape() { }class Point :public Shape{virtual void Draw (const Graphics& g) class Line :public Shape{virtual void Draw (const Graphics& g) class MainForm :public Form {private :vector <Shape *> shapes;protected :virtual void OnMouseUp (const MouseEventArgs& e) virtual void OnPaint (const PaintEventArgs& e) void MainForm::OnMouseUp (const MouseEventArgs& e) void MainForm::OnPaint (const PaintEventArgs& e) for (int i = 0 ; i < shapes.size (); i++){
概念 设计模式要解决的能解决的问题,是程序同时有“稳定不变的部分”和“可能发生变化的部分”时,如何提高代码重用性。目标是将变化的部分规约到一起,并使扩展功能变得容易一些。如果只有稳定的部分,不需要设计模式。如果全是变化的部分,使用设计模式并不能到达目的。
面向对象的理解 一般术语的含义
运行时:程序已经被编译,加载到内存中的二进制形式。
扩展:一般来讲,就是建立新的子类,override父类中提供变化的接口方法。
稳定:一般指代码被编译成二进制之后,不会再改变(或者说很少改变)。不是说一个代码文件中,没有改变的代码片段。
变化:一般时程序中,会随着需求、场景、时间等频繁切换或者改变。这部分会经常要求重新编译。
不可修改:一般就是指源代码不会更改。
接口:一个类(抽象基类)对外开放的方法,一般会有统一的设计准则。
绑定:一般就是指调用关系,一个类中的方法会调用到另一个类中的方法实现。类间可以为父子关系。
原则
依赖倒置原则(DIP)
高层模块(稳定)不应该依赖于低层模块(变化),二者都应该依赖于抽象(稳定)
。
抽象(稳定)不应该依赖于实现细节(变化)
,实现细节应该依赖于抽象(稳定)。
开放封闭原则(OCP)
对扩展开放,对更改封闭
类模块应该是可扩展的,但是不可修改
单一职责原则(SRP)
一个类应该仅有一个引起它变化的原因
变化的方向隐含着类的责任
Liskov 替换原则(LSP)
子类必须能够替换它们的基类(IS-A)
继承表达类型抽象
接口隔离原则(ISP)
不应该强迫客户程序依赖它们不用的方法
接口应该小而完备
优先使用对象组合,而不是类继承
类继承通常为“白箱复用”,对象组合通常为“黑箱复用”
继承在某种程度上破坏了封装性,子类父类耦合度高
而对象组合则只要求被组合的对象具有良好定义的接口,耦合度低
封装变化点
使用封装来创建对象之间的分界层,让设计者可以在分界层的一侧进行修改,而不会对另一侧产生不良的影响,从而实现层次间的松耦合。
针对接口编程,而不是针对实现编程
不将变量类型声明为某个特定的具体类,而是声明为某个接口
客户程序无需获知对象的具体类型,只需要知道对象所具有的接口
减少系统中各部分的依赖关系,从而实现“高内聚、松耦合”的类型设计方案
很抽象的总结,结合具体模式体会。
分类 从目的来看:
创建型(Creational)模式:将对象的部分创建工作延迟到子类或者其他对象,从而应对需求变化为对象创建时具体类型实现引来的冲击。
结构型(Structural)模式:通过类继承或者对象组合获得更灵活的结构,从而应对需求变化为对象的结构带来的冲击。
行为型(Behavioral)模式:通过类继承或者对象组合来划分类与对象间的职责,从而应对需求变化为多个交互的对象带来的冲击。
从范围来看:
类模式处理类与子类的静态关系。
对象模式处理对象间的动态关系。
从封装变化角度对模式分类:
组件协作: • Template Method • Observer / Event • Strategy
单一职责: • Decorator • Bridge
对象创建: • Factory Method • Abstract Factory • Prototype •
Builder
对象性能: • Singleton • Flyweight
接口隔离: • Façade • Proxy • Mediator • Adapter
状态变化: • Memento • State
数据结构: • Composite • Iterator • Chain of Responsibility
行为变化: • Command • Visitor
领域问题: • Interpreter
现代软件设计的特征是“需求的频繁变化”。设计模式的要点是“寻找变化点,然后在变化点处应用设计模式,从而来更好地应对需求的变化”。“什么时候、什么地点应用设计模式”比“理解设计模式结构本身”更为重要。
设计模式的应用不宜先入为主,一上来就使用设计模式是对设计模式的最大误用。没有一步到位的设计模式。敏捷软件开发实践提倡的“Refactoring
to Patterns ”是目前普遍公认的最好的使用设计模式的方法。
重构技法
静态 转 动态
早绑定 转 晚绑定
继承 转 组合
编译时依赖 转 运行时依赖
紧耦合 转 松耦合
虽然表述上不同,但是实质上意思是类似的。
组件协作相关模式 现代软件专业分工之后的第一个结果是“框架与应用程序的划分”,“组件协作”模式通过晚绑定 (父类中调用子类的方法实现,虚函数实现),来实现框架与应用程序之间的松耦合,是二者之间协作时常用的模式。
典型模式:
Template Method
Observer / Event
Strategy
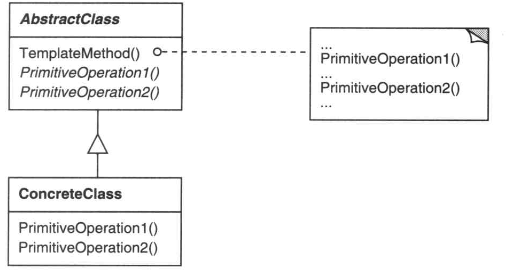
Template Method 对于某一项任务,它常常有稳定的整体操作结构,但各个子步骤却有很多改变的需求,或者由于固有的原因(比如框架与应用之间的关系)而无法和任务的整体结构同时实现。
在确定稳定操作结构的前提下,来灵活应对各个子步骤的变化或者晚期实现需求。
示例2 设计一个library,支持application在使用时可以自定义框架中的某些步骤。
实现一,Application实现过程还需要完成main函数中调用library,并完成算法逻辑的过程。
1
2
3
4
5
6
7
8
9
10
11
12
13
14
15
16
17
18
19
20
21
22
23
24
25
26
27
class Library {public :void Step1 () void Step3 () void Step5 () class Application {public :bool Step2 () void Step4 () int main () Library lib () ;Application app () ;if (app.Step2()){for (int i = 0 ; i < 4 ; i++){
实现二,利用虚函数,将固定的算法逻辑在lib中实现,运行时调用App中实现的override的自定义步骤。
1
2
3
4
5
6
7
8
9
10
11
12
13
14
15
16
17
18
19
20
21
22
23
24
25
26
27
28
29
30
31
32
33
34
35
36
37
38
39
40
class Library {public :void Run () if (Step2()) for (int i = 0 ; i < 4 ; i++)virtual ~Library(){ }protected :void Step1 () void Step3 () void Step5 () virtual bool Step2 () 0 ;virtual void Step4 () 0 ; class Application :public Library {protected :virtual bool Step2 () virtual void Step4 () int main () new Application();delete pLib;
实际上就是个虚函数的应用。这里的第一种为早绑定,在app程序中,实现固定不变的流程,并调用lib中的方法。第二种是晚绑定,固定流程实现在lib中,app只关心变化的部分,实现自定义的方法即可,从lib中延迟调用app实现的自定义方法。
ConcreteClass靠AbstractClass来实现算法中不变的步骤。
抽象代码结构 1 2 3 4 5 6 7 8 9 10 11 12 13 14 15 16 17 18 19 20 21 22 23 24 25 26 27 28 29 30 31 32 33 34 35 36 37 38 39 40 41 42 43 44 45 46 47 48 49 50 51 52 53 54 55 56 57 58 59 #include <iostream> class AbstractClass { public :virtual ~AbstractClass() {}void templateMethod () {virtual void primitiveOperation1 () 0 ;virtual void primitiveOperation2 () 0 ;class ConcreteClass :public AbstractClasspublic :void primitiveOperation1 () {std ::cout << "Primitive operation 1" << std ::endl ;void primitiveOperation2 () {std ::cout << "Primitive operation 2" << std ::endl ;int main () new ConcreteClass;delete tm;return 0 ;
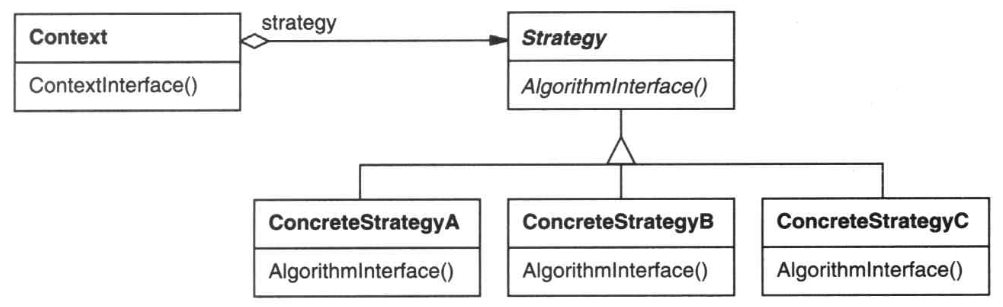
Strategy 在软件构建过程中,某些对象使用的算法可能多种多样,经常改变,如果将这些算法都编码到对象中,将会使对象变得异常复杂;而且有时候支持不使用的算法也是一个性能负担。
Strategy将算法与对象本身解耦。
Strategy表述为:
定义一系列算法,把它们一个个封装起来,并且使它们可互相替换(变化)。该模式使得算法可独立于使用它的客户程序(稳定)而变化(扩展,子类化)。
示例3 设计一个计税程序,根据不同国家税法,进行计算。
方法一,使用 if else 结构,将不同方法整合再一个对象中。
1 2 3 4 5 6 7 8 9 10 11 12 13 14 15 16 17 18 19 20 21 22 enum TaxBase {class SalesOrder {public :double CalculateTax () if (tax == CN_Tax){...}else if (tax == US_Tax){...}else if (tax == DE_Tax){...}else if (tax == FR_Tax){
方法二,使用类实现不同策略,在应用程序部分实现不变化的部分。
1 2 3 4 5 6 7 8 9 10 11 12 13 14 15 16 17 18 19 20 21 22 23 24 25 26 27 28 class TaxStrategy {public :virtual double Calculate (const Context& context) 0 ;virtual ~TaxStrategy(){}class CNTax :public TaxStrategy{public :virtual double Calculate (const Context& context) class USTax :public TaxStrategy{public :virtual double Calculate (const Context& context) class DETax :public TaxStrategy{public :virtual double Calculate (const Context& context) class FRTax :public TaxStrategy{public :virtual double Calculate (const Context& context)
1 2 3 4 5 6 7 8 9 10 11 12 13 14 15 16 17 18 19 20 class SalesOrder {private :public :this ->strategy = strategyFactory->NewStrategy();delete this ->strategy;public double CalculateTax () Context context () ;double val = strategy->Calculate(context);
实现不同策略类,通过工厂模式传入策略,保持了稳定的流程部分不会改变。
这里的代码整合到了一起,实际上是在不同的文件中。
一般if
else涉及多种场景切换且可能出现扩展需求的地方,都可以考虑使用strategy模式。更多的strategy对象,可能存在一些额外的开销,可以考虑设计为singleton模式。这样不同的context也可以共享一个strategy对象,节省了开销。
抽象代码结构 1 2 3 4 5 6 7 8 9 10 11 12 13 14 15 16 17 18 19 20 21 22 23 24 25 26 27 28 29 30 31 32 33 34 35 36 37 38 39 40 41 42 43 44 45 46 47 48 49 50 51 52 53 54 55 56 57 58 59 60 61 62 63 64 65 66 67 68 69 70 71 72 73 74 75 76 77 78 79 80 81 82 83 84 85 86 87 #include <iostream> class Strategy { public :virtual ~Strategy() { }virtual void algorithmInterface () 0 ;class ConcreteStrategyA :public Strategypublic :void algorithmInterface () {std ::cout << "Concrete Strategy A" << std ::endl ;class ConcreteStrategyB :public Strategypublic :void algorithmInterface () {std ::cout << "Concrete Strategy B" << std ::endl ;class ConcreteStrategyC :public Strategypublic :void algorithmInterface () {std ::cout << "Concrete Strategy C" << std ::endl ;class Context { public :const s ) : strategy( s ) {}delete strategy;void contextInterface () {private :int main () Context context ( new ConcreteStrategyA() ) ;return 0 ;
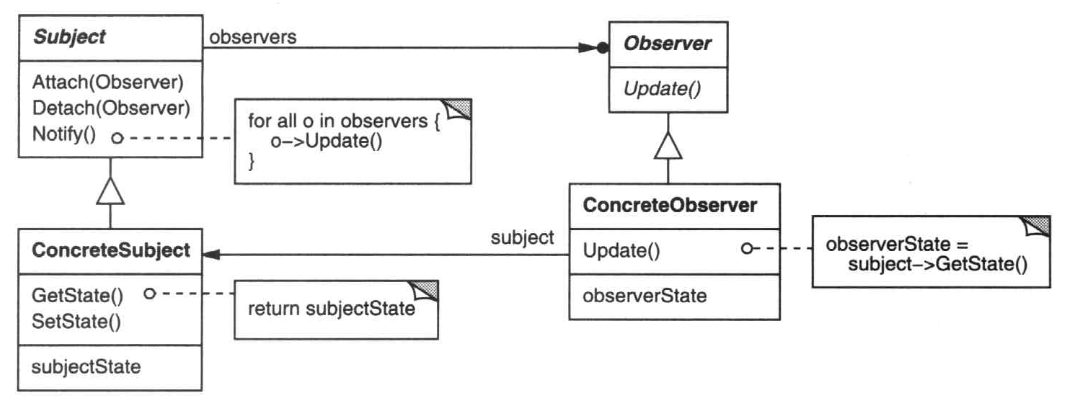
Observer 在软件构建过程中,我们需要为某些对象建立一种“通知依赖关系”
——一个对象(目标对象)的状态发生改变,所有的依赖对象(观察者对象)都将得到通知。
定义描述:
定义对象间的一种一对多(变化)的依赖关系,以便当一个对象(Subject)的状态发生改变时,所有依赖于它的对象都得到通知并自动更新。
比如,当用户改变表格中的信息时, 柱状图能立即反映这一变化。
示例4 在一个大文件切分为小文件储存的过程中,增加不同的进度条显示。
方法一,直接在FileSpliter类中,调用进度条管理对象。
1 2 3 4 5 6 7 8 9 10 11 12 13 14 15 16 17 18 19 20 21 22 23 class FileSplitter { string m_filePath;int m_fileNumber;public :const string & filePath, int fileNumber, ProgressBar* progressBar) :void split () for (int i = 0 ; i < m_fileNumber; i++){1 ) / (float )progressValue;
1 2 3 4 5 6 7 8 9 10 11 12 13 14 15 16 17 class MainForm :public Formpublic :void Button1_Click () string filePath = txtFilePath->getText();int number = atoi(txtFileNumber->getText().c_str());FileSplitter splitter (filePath, number, progressBar) ;
以上实现,FileSplitter不能传入其它类型的进度条对象。不符合依赖倒置原则。
高层模块(稳定)不应该依赖于低层模块(变化),二者都应该依赖于抽象(稳定)
。
抽象(稳定)不应该依赖于实现细节(变化)
,实现细节应该依赖于抽象(稳定)。
要改,就是将具体进度条对象,想办法变成一个抽象的父类对象。
方法二,使用observer,抽象一个IProgress基类对象,让FileSpliter依赖它。
1 2 3 4 5 6 7 8 9 10 11 12 13 14 15 16 17 18 19 20 21 22 23 24 25 26 27 28 29 30 31 32 33 34 35 36 37 38 39 40 41 42 43 44 45 46 47 48 49 50 51 52 class IProgress {public :virtual void DoProgress (float value) 0 ;virtual ~IProgress(){}class FileSplitter { string m_filePath;int m_fileNumber;public :const string & filePath, int fileNumber) :void split () for (int i = 0 ; i < m_fileNumber; i++){1 ) / (float )progressValue;void addIProgress (IProgress* iprogress) void removeIProgress (IProgress* iprogress) remove (iprogress);protected :virtual void onProgress (float value) begin ();while (itor != m_iprogressList.end () )
1 2 3 4 5 6 7 8 9 10 11 12 13 14 15 16 17 18 19 20 21 22 23 24 25 26 27 28 29 30 31 32 33 34 35 36 37 38 39 40 41 42 class ConsoleObserver :public IProgress {public :virtual void DoProgress (float value) cout << "." ;class MainForm :public Form, public IProgresspublic :void Button1_Click () string filePath = txtFilePath->getText();int number = atoi(txtFileNumber->getText().c_str());FileSplitter splitter (filePath, number) ;this ); this );virtual void DoProgress (float value)
以上抽象出一个observer基类,由subject进行状态的传递,解耦了进度条对象大的设计。
Subject(目标)
—目标知道它的观察者。可以有任意多个观察者观察同一个目标。
—提供注册和删除观察者对象的接口。
Observer(观察者)
—为那些在目标发生改变时需获得通知的对象定义一个更新接口。
ConcreteSubject(具体目标)
—将有关状态存入各ConcreteObserver对象。
—当它的状态发生改变时,向它的各个观察者发出通知。
ConcreteObserver(具体观察者)
—维护一个指向ConcreteSubject对象的引用。
—存储有关状态,这些状态应与目标的状态保持一致。
—实现Observer的更新接口以使自身状态与目标的状态保持一致。
抽象代码结构 1 2 3 4 5 6 7 8 9 10 11 12 13 14 15 16 17 18 19 20 21 22 23 24 25 26 27 28 29 30 31 32 33 34 35 36 37 38 39 40 41 42 43 44 45 46 47 48 49 50 51 52 53 54 55 56 57 58 59 60 61 62 63 64 65 66 67 68 69 70 71 72 73 74 75 76 77 78 79 80 81 82 83 84 85 86 87 88 89 90 91 92 93 94 95 96 97 98 99 100 101 102 103 104 105 106 107 108 109 110 111 112 113 114 115 116 117 118 119 120 121 122 123 124 125 126 127 128 129 130 131 132 133 134 135 136 #include <iostream> #include <vector> class Subject ;class Observer { public :virtual ~Observer() {}virtual int getState () 0 ;virtual void update ( Subject *subject ) 0 ;class ConcreteObserver :public Observerpublic :const int state ) :int getState () {return observer_state;void update ( Subject *subject ) private :int observer_state;class Subject { public :virtual ~Subject() {}void attach ( Observer *observer ) {void detach ( const int index ) {begin () + index );void notify () {for ( unsigned int i = 0 ; i < observers.size (); i++ )this );virtual int getState () 0 ;virtual void setState ( const int s ) 0 ;private :std ::vector <Observer*> observers;class ConcreteSubject :public Subjectpublic :int getState () {return subject_state;void setState ( const int s ) {private :int subject_state;void ConcreteObserver::update ( Subject *subject ) std ::cout << "Observer state updated." << std ::endl ;int main () ConcreteObserver observer1 ( 1 ) ;ConcreteObserver observer2 ( 2 ) ;std ::cout << "Observer 1 state: " << observer1.getState() << std ::endl ;std ::cout << "Observer 2 state: " << observer2.getState() << std ::endl ;new ConcreteSubject();attach ( &observer1 );attach ( &observer2 );10 );std ::cout << "Observer 1 state: " << observer1.getState() << std ::endl ;std ::cout << "Observer 2 state: " << observer2.getState() << std ::endl ;delete subject;return 0 ;
单一职责相关模式 在软件组件的设计中,如果责任划分的不清晰,使用继承得到的结果往往是随着需求的变化,子类急剧膨胀,同时充斥着重复代码,这时候的关键是划清责任。
典型模式
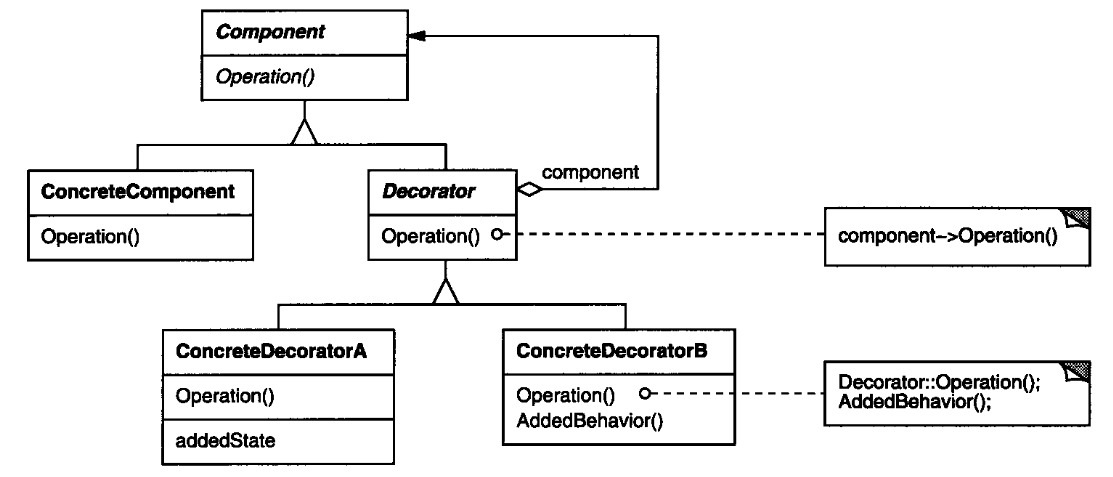
Decorator 使用继承来扩展对象的功能,为类型引入的静态特质,使得这种扩展方式缺乏灵活性;
并且随着子类的增多(扩展功能的增多),各种子类的组合(扩展功能的组合)会导致更多子类的膨胀。
动态(组合)地给一个对象增加一些额外的职责。就增加功能而言,Decorator模式比生成子类(继承)更为灵活(消除重复代码
& 减少子类个数)。
示例5 设计一个数据流处理系统,后续在基础系统之上,扩展不同类型的流,以及增加加密、缓存功能。
实现一,使用类继承的方式:
1 2 3 4 5 6 7 8 9 10 11 12 13 14 15 16 17 18 19 20 21 22 23 24 25 26 27 28 29 30 31 32 33 34 35 36 37 38 39 40 41 42 43 44 45 46 47 48 49 50 51 52 53 54 55 56 57 58 59 60 61 62 63 64 65 66 67 68 69 class Stream {public :virtual char Read (int number) 0 ;virtual void Seek (int position ) 0 ;virtual void Write (char data) 0 ;virtual ~Stream (){}class FileStream :public Stream {public :virtual char Read (int number) virtual void Seek (int position ) virtual void Write (char data) class NetworkStream :public Stream {public :virtual char Read (int number) virtual void Seek (int position ) virtual void Write (char data) class CryptoFileStream :public FileStream{public :virtual char Read (int number) virtual void Seek (int position ) position );virtual void Write (byte data) class CryptoNetworkStream :public NetworkStream{public :virtual char Read (int number) virtual void Seek (int position ) virtual void Write (byte data) class BufferedFileStream :public FileStream{virtual char Read (int number) virtual void Seek (int position ) virtual void Write (byte data) class BufferedNetworkStream :public NetworkStream{virtual char Read (int number) virtual void Seek (int position ) virtual void Write (byte data) class CryptoBufferedFileStream :public FileStream{public :virtual char Read (int number) virtual void Seek (int position ) virtual void Write (byte data)
大量重复代码,类数量随功能数增长很快。
实现二,使用组合而不是继承。将功能抽象成一种装饰类。
1 2 3 4 5 6 7 8 9 10 11 12 13 14 15 16 17 18 19 20 21 22 23 24 25 26 27 28 29 30 31 32 33 34 35 36 37 38 39 40 41 42 43 44 45 46 47 48 49 50 51 52 53 54 55 56 57 58 59 60 61 62 63 64 65 66 67 68 69 70 71 72 73 74 75 76 77 78 class Stream {public :virtual char Read (int number) 0 ;virtual void Seek (int position ) 0 ;virtual void Write (char data) 0 ;virtual ~Stream (){}class FileStream :public Stream {public :virtual char Read (int number) virtual void Seek (int position ) virtual void Write (char data) class NetworkStream :public Stream {public :virtual char Read (int number) virtual void Seek (int position ) virtual void Write (char data) class CryptoStream :public Stream {private :Stream * stream;public :Stream * stream):stream(stream){...}virtual char Read (int number) virtual void Seek (int position ) position );virtual void Write (byte data) class BufferedStream :public Stream {private :Stream * stream;public :Stream * stream):stream(stream){}virtual char Read (int number) virtual void Seek (int position ) position );virtual void Write (byte data) int main () new FileStream();new CryptoStream(s1);new BufferedStream(s1);new BufferedStream(s2);
实现三,将拥有共同成员的BufferedStream和CryptoStream再抽象出一个父类。
1 2 3 4 5 6 7 8 9 10 11 12 13 14 15 16 17 18 19 20 21 22 23 24 25 26 27 28 29 30 31 32 33 34 35 36 class Stream {class FileStream :public Stream {class NetworkStream :public Stream {public Stream {protected :Stream * stream;Stream * stm):stream(stm){...}class CryptoStream :public DecoratorStream {public :Stream * stream):DecoratorStream(stream){...}virtual char Read (int number) virtual void Seek (int position ) virtual void Write (byte data) class BufferedStream :public DecoratorStream{public :Stream * stream):DecoratorStream(stream){}virtual char Read (int number) virtual void Seek (int position ) virtual void Write (byte data)
以下情况使用 Decorator模式
在不影响其他对象的情况下,以动态、透明的方式给单个对象添加职责。
处理那些可以撤消的职责。
当不能采用生成子类的方法进行扩充时。一种情况是,可能有大量独立的扩展,为支持每一种组合将产生大量的子类,使得子类数目呈爆炸性增长。另一种情况可能是因为类定义被隐藏,或类定义不能用于生成子类。
抽象结构如下:
抽象代码结构 1 2 3 4 5 6 7 8 9 10 11 12 13 14 15 16 17 18 19 20 21 22 23 24 25 26 27 28 29 30 31 32 33 34 35 36 37 38 39 40 41 42 43 44 45 46 47 48 49 50 51 52 53 54 55 56 57 58 59 60 61 62 63 64 65 66 67 68 69 70 71 72 73 74 75 76 77 78 79 80 81 82 83 84 85 86 87 88 89 90 91 92 93 94 95 96 97 98 99 100 101 102 #include <iostream> class Component { public :virtual ~Component() {}virtual void operation () 0 ;class ConcreteComponent :public Componentpublic :void operation () {std ::cout << "Concrete Component operation" << std ::endl ;class Decorator :public Componentpublic :virtual void operation () {private :class ConcreteDecoratorA :public Decoratorpublic :void operation () {std ::cout << "Decorator A" << std ::endl ;class ConcreteDecoratorB :public Decoratorpublic :void operation () {std ::cout << "Decorator B" << std ::endl ;int main () new ConcreteComponent();new ConcreteDecoratorB( cc );new ConcreteDecoratorA( db );delete da;delete db;delete cc;return 0 ;
通过采用组合而非继承的手法,
Decorator模式实现了在运行时动态扩展对象功能的能力,而且可以根据需要扩展多个功能。
Decorator类在接口上表现为is-a
Component的继承关系,即Decorator类继承了Component类所具有的接口。但在实现上又表现为has-a
Component的组合关系,即Decorator类又使用了另外一个Component类。
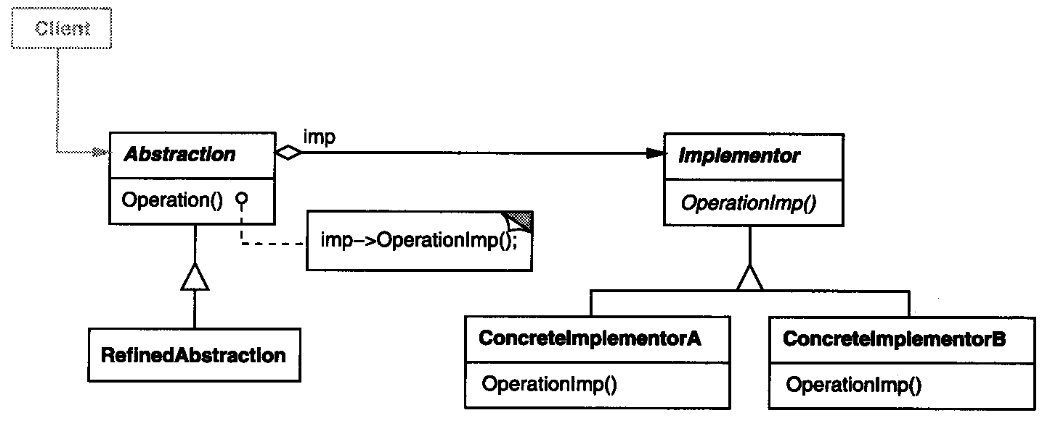
Bridge 将抽象部分(业务功能)与实现部分(平台实现)分离,使它们都可以独立地变化。
简单来讲,就是将变化划分成不同的类别,通过父类统一某一类变化的接口。通过组合抽象父类的指针成员,达到简化代码的目的。有点抽象,看示例。
示例6 实现一个消息通知程序,再不同的使用平台,有不同的表现形式。
实现一,通过类继承,达到适应不同平台的目的。
1 2 3 4 5 6 7 8 9 10 11 12 13 14 15 16 17 18 19 20 21 22 23 24 25 26 27 28 29 30 31 32 33 34 35 36 37 38 39 40 41 42 43 44 45 46 47 48 49 50 51 52 53 54 55 56 57 58 59 60 61 62 63 64 65 66 class Messager {public :virtual void Login (string username, string password) 0 ;virtual void SendMessage (string message) 0 ;virtual void SendPicture (Image image ) 0 ;virtual void PlaySound () 0 ;virtual void DrawShape () 0 ;virtual void WriteText () 0 ;virtual void Connect () 0 ;virtual ~Messager(){}class PCMessagerBase :public Messager{public :virtual void PlaySound () virtual void DrawShape () virtual void WriteText () virtual void Connect () class MobileMessagerBase :public Messager{public :virtual void PlaySound () virtual void DrawShape () virtual void WriteText () virtual void Connect () class PCMessagerLite :public PCMessagerBase {public :virtual void Login (string username, string password) virtual void SendMessage (string message) virtual void SendPicture (Image image ) class PCMessagerPerfect :public PCMessagerBase {public :virtual void Login (string username, string password) virtual void SendMessage (string message) virtual void SendPicture (Image image ) class MobileMessagerLite :public MobileMessagerBase {...};class MobileMessagerPerfect :public MobileMessagerBase {...};
实现二,使用组合而不是继承,同时分离基类中平台实现和业务逻辑部分,保证两部分的派生类都可以分别实例化。
1 2 3 4 5 6 7 8 9 10 11 12 13 14 15 16 17 18 19 20 21 22 23 24 25 26 27 28 29 30 31 32 33 34 35 36 37 38 39 40 41 42 43 44 45 46 47 48 49 50 51 52 53 54 55 56 57 58 59 60 61 62 63 64 65 66 67 68 69 70 71 72 73 class Messager {protected :public :virtual void Login (string username, string password) 0 ;virtual void SendMessage (string message) 0 ;virtual void SendPicture (Image image ) 0 ;virtual ~Messager(){}class MessagerImp {public :virtual void PlaySound () 0 ;virtual void DrawShape () 0 ;virtual void WriteText () 0 ;virtual void Connect () 0 ;virtual MessagerImp () class PCMessagerImp :public MessagerImp{public :virtual void PlaySound () virtual void DrawShape () virtual void WriteText () virtual void Connect () class MobileMessagerImp :public MessagerImp{public :virtual void PlaySound () virtual void DrawShape () virtual void WriteText () virtual void Connect () class MessagerLite :public Messager {public :virtual void Login (string username, string password) virtual void SendMessage (string message) virtual void SendPicture (Image image ) class MessagerPerfect :public Messager {public :virtual void Login (string username, string password) virtual void SendMessage (string message) virtual void SendPicture (Image image )
桥模式相比于Decorator模式,主要是针对基类,分离了不同变化方向(有点抽象,就像x轴y轴代表不同维度)的成员,分离成多个类。
抽象代码结构 1 2 3 4 5 6 7 8 9 10 11 12 13 14 15 16 17 18 19 20 21 22 23 24 25 26 27 28 29 30 31 32 33 34 35 36 37 38 39 40 41 42 43 44 45 46 47 48 49 50 51 52 53 54 55 56 57 58 59 60 61 62 63 64 65 66 67 68 69 70 71 72 73 74 75 76 77 78 79 80 81 82 83 84 85 86 87 88 89 90 91 92 93 94 95 96 97 #include <iostream> class Implementor { public :virtual ~Implementor() {}virtual void action () 0 ;class ConcreteImplementorA :public Implementorpublic :void action () {std ::cout << "Concrete Implementor A" << std ::endl ;class ConcreteImplementorB :public Implementorpublic :void action () {std ::cout << "Concrete Implementor B" << std ::endl ;class Abstraction { public :virtual ~Abstraction() {}virtual void operation () 0 ;class RefinedAbstraction :public Abstractionpublic :void operation () {private :int main () new ConcreteImplementorA;new ConcreteImplementorB;new RefinedAbstraction(ia);new RefinedAbstraction(ib);delete abstract1;delete abstract2;delete ia;delete ib;return 0 ;
对象创建相关模式 通过“对象创建”
模式绕开new,来避免对象创建(new)过程中所导致的紧耦合(依赖具体类),从而支持对象创建的稳定。它是接口抽象之后的第一步工作。
面向接口,可以视为依赖抽象基类,调用抽象基类方法。
典型模式:
Factory Method
Abstract Factory
Prototype
Builder
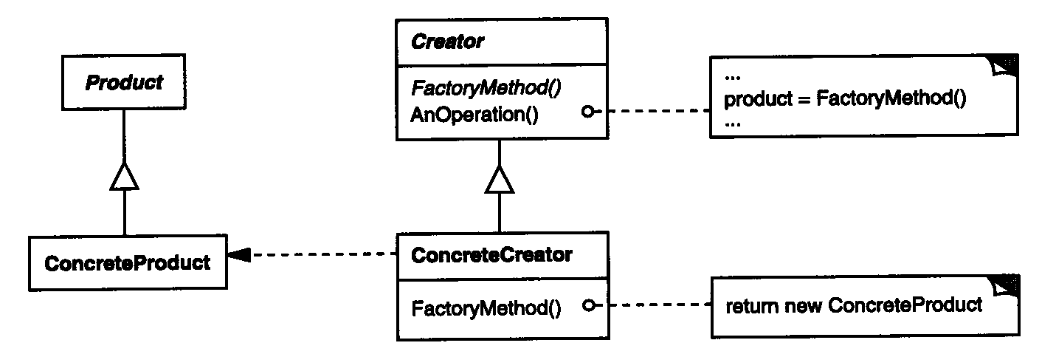
Factory Method 在软件系统中,经常面临着创建对象的工作;由于需求的变化,需要创建的对象的具体类型经常变化。
将程序中,对具体对象的依赖,转变为对抽象的创建对象的接口的依赖。
定义一个用于创建对象的接口,让子类决定实例化哪一个类。Factory
Method使得一个类的实例化延迟(目的:解耦,手段:虚函数)到子类。
示例1 实现一个能够切分不同类型文件的切分程序。
实现一,直接建立不同的具体切分对象。
class ISplitter {public :virtual void split () 0 ;virtual ~ISplitter(){}class BinarySplitter :public ISplitter{...};class TxtSplitter :public ISplitter{...};
class MainForm :public Form {public :void Button_Click () new BinarySplitter();
显然,new
BinarySplitter()需要根据不同的文件类型,进行修改。一旦修改,源文件就需要重新编译。
实现二,使用抽象的工厂,提供对象创建的接口。
1 2 3 4 5 6 7 8 9 10 11 12 13 14 15 16 17 18 19 20 21 22 23 24 25 26 27 28 29 30 31 32 33 class ISplitter {public :virtual void split () 0 ;virtual ~ISplitter(){}class SplitterFactory {public :virtual ISplitter* CreateSplitter () 0 ;virtual ~SplitterFactory(){}class BinarySplitter :public ISplitter{...};class TxtSplitter :public ISplitter{...};class BinarySplitterFactory :public SplitterFactory{public :virtual ISplitter* CreateSplitter () return new BinarySplitter();class TxtSplitterFactory :public SplitterFactory{public :virtual ISplitter* CreateSplitter () return new TxtSplitter();
class MainForm :public Form{public :this ->factory=factory;void Button_Click ()
现在,创建不同对象,只需要输入不同的工厂对象。虽然依旧是要创建对象,但是,在编译单元层面,以上代码是不用重新编译的。有新的类型需要创建,直接增加一个新的源文件即可。
Factory
Method模式用于隔离类对象的使用者和具体类型之间的耦合关系。面对一个经常变化的具体类型,紧耦合关系(new)会导致软件的脆弱。
将所要创建的具体对象工作延迟到子类(BinarySplitterFactory、TxtSplitterFactory),从而实现一种扩展(而非更改)的策略。
抽象代码结构 1 2 3 4 5 6 7 8 9 10 11 12 13 14 15 16 17 18 19 20 21 22 23 24 25 26 27 28 29 30 31 32 33 34 35 36 37 38 39 40 41 42 43 44 45 46 47 48 49 50 51 52 53 54 55 56 57 58 59 60 61 62 63 64 65 66 67 68 69 70 71 72 73 74 75 76 77 78 79 80 81 82 83 84 85 86 87 88 89 90 91 92 93 94 95 96 97 98 99 100 101 102 103 104 105 106 107 108 109 110 111 #include <iostream> #include <string> class Product { public :virtual ~Product() {}virtual std ::string getName () 0 ;class ConcreteProductA :public Productpublic :std ::string getName () {return "type A" ;class ConcreteProductB :public Productpublic :std ::string getName () {return "type B" ;class Creator { public :virtual ~Creator() {}virtual Product* createProductA () 0 ;virtual Product* createProductB () 0 ;virtual void removeProduct ( Product *product ) 0 ;class ConcreteCreator :public Creatorpublic :Product* createProductA () {return new ConcreteProductA();Product* createProductB () {return new ConcreteProductB();void removeProduct ( Product *product ) {delete product;int main () new ConcreteCreator();std ::cout << "Product: " << p1->getName() << std ::endl ;std ::cout << "Product: " << p2->getName() << std ::endl ;delete creator;return 0 ;
以上代码的 creator
将不同创建方法整合到一个类中。也可以按照示例1的方法,creator
转化为不同的子类。
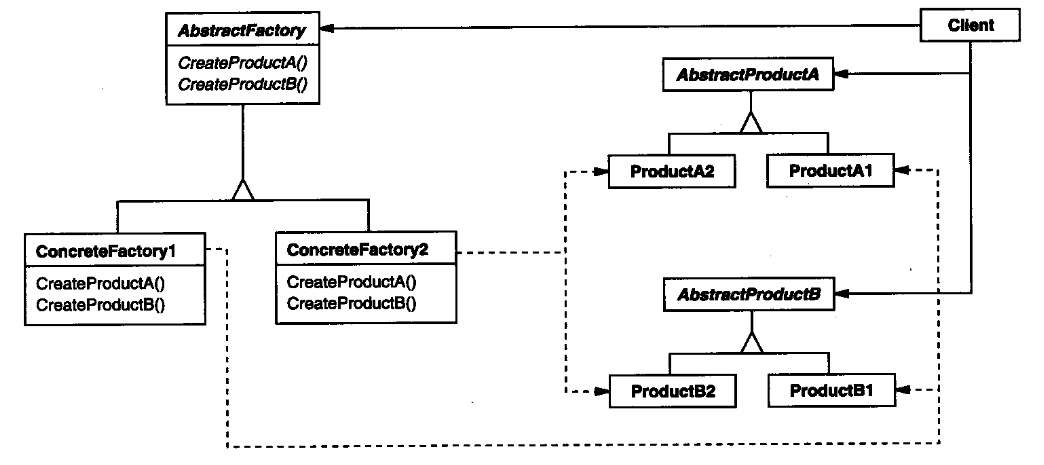
Abstract Factory 类似Factory
Method的作用,不过需要创建的对象是“一系列相互关联的对象”。这个时候,将这一系列对象的创建,汇集到一个工厂类中。
示例2 实现一个可以使用不同的数据库的类,可进行数据库的连接、SQL语句执行。
实现一,根据不同功能,建立不同的工厂。
1 2 3 4 5 6 7 8 9 10 11 12 13 14 15 16 17 18 19 20 21 22 23 24 25 26 27 28 class IDBConnection {class IDBConnectionFactory {public :virtual IDBConnection* CreateDBConnection () 0 ;class IDBCommand {class IDBCommandFactory {public :virtual IDBCommand* CreateDBCommand () 0 ;class IDataReader {class IDataReaderFactory {public :virtual IDataReader* CreateDataReader () 0 ;class SqlConnection :public IDBConnection{};class SqlConnectionFactory :public IDBConnectionFactory{};class SqlCommand :public IDBCommand{};class SqlCommandFactory :public IDBCommandFactory{};class SqlDataReader :public IDataReader{};class SqlDataReaderFactory :public IDataReaderFactory{};
1 2 3 4 5 6 7 8 9 10 11 12 13 14 15 16 17 18 19 20 21 22 class EmployeeDAO {public :vector <EmployeeDO> GetEmployees () "..." );"..." );while (reader->Read()){...}
以上代码,除了不够简洁,还有可能传入不匹配的 Connection 对象和
Command 对象(比如 SQL的Connection 和 MongoDB的Command)。
实现二,使用一个工厂,完成对象创建。
1 2 3 4 5 6 7 8 9 10 11 12 13 14 15 16 17 18 19 20 21 22 23 24 25 26 27 28 29 30 31 class IDBConnection {class IDBCommand {class IDataReader {class IDBFactory {public :virtual IDBConnection* CreateDBConnection () 0 ;virtual IDBCommand* CreateDBCommand () 0 ;virtual IDataReader* CreateDataReader () 0 ;class SqlConnection :public IDBConnection{...};class SqlCommand :public IDBCommand{...};class SqlDataReader :public IDataReader{...};class SqlDBFactory :public IDBFactory{public :virtual IDBConnection* CreateDBConnection () 0 ;virtual IDBCommand* CreateDBCommand () 0 ;virtual IDataReader* CreateDataReader () 0 ;
class EmployeeDAO {public :vector <EmployeeDO> GetEmployees () "..." );"..." );while (reader->Read()){...}
使用一个类管理相关对象的创建。Abstract
Factory模式主要在于应对“新系列”的需求变动。其缺点在于难以应对“新对象”的需求变动,这就是Factory
Method的事情了。
抽象代码结构 1 2 3 4 5 6 7 8 9 10 11 12 13 14 15 16 17 18 19 20 21 22 23 24 25 26 27 28 29 30 31 32 33 34 35 36 37 38 39 40 41 42 43 44 45 46 47 48 49 50 51 52 53 54 55 56 57 58 59 60 61 62 63 64 65 66 67 68 69 70 71 72 73 74 75 76 77 78 79 80 81 82 83 84 85 86 87 88 89 90 91 92 93 94 95 96 97 98 99 100 101 102 103 104 105 106 107 108 109 110 111 112 113 114 115 116 117 118 119 120 121 122 123 124 125 126 127 128 129 130 131 132 133 134 135 136 137 138 139 140 141 142 143 144 145 146 147 148 149 150 151 152 153 154 155 156 #include <iostream> class ProductA { public :virtual ~ProductA() {}virtual const char * getName () 0 ;class ConcreteProductAX :public ProductApublic :const char * getName () {return "A-X" ;class ConcreteProductAY :public ProductApublic :const char * getName () {return "A-Y" ;class ProductB { public :virtual ~ProductB() {}virtual const char * getName () 0 ;class ConcreteProductBX :public ProductBpublic :const char * getName () {return "B-X" ;class ConcreteProductBY :public ProductBpublic :const char * getName () {return "B-Y" ;class AbstractFactory { public :virtual ~AbstractFactory() {}virtual ProductA *createProductA () 0 ;virtual ProductB *createProductB () 0 ;class ConcreteFactoryX :public AbstractFactorypublic :ProductA *createProductA () {return new ConcreteProductAX();ProductB *createProductB () {return new ConcreteProductBX();class ConcreteFactoryY :public AbstractFactorypublic :ProductA *createProductA () {return new ConcreteProductAY();ProductB *createProductB () {return new ConcreteProductBY();int main () new ConcreteFactoryX();new ConcreteFactoryY();std ::cout << "Product: " << p1->getName() << std ::endl ;std ::cout << "Product: " << p2->getName() << std ::endl ;delete p1;delete p2;delete factoryX;delete factoryY;return 0 ;
结构和示例2稍有不同。
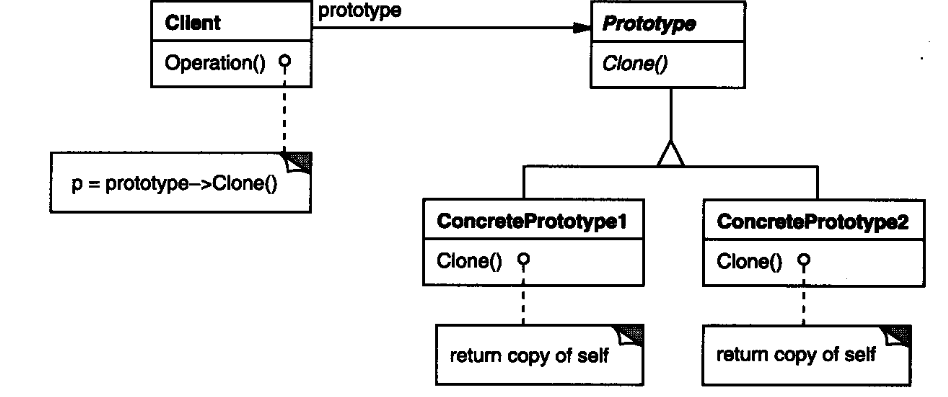
Prototype 和Factory
Method一样,用于创造对象,但是是通过拷贝原型来创建对象。类的拷贝构造函数需要指定正确。拷贝指的是深拷贝。
和Factory
Method不同的是,Prototype更关注对象初始状态的变化,可以创建几种不同的状态的原型,供程序使用。
示例3 示例和Factory Method一样,在Factory
Method基础上做了改动,变成Prototype模式。
1 2 3 4 5 6 7 8 9 10 11 12 13 14 15 16 17 18 19 20 21 22 class ISplitter {public :virtual void split () 0 ;virtual ISplitter* clone () 0 ; virtual ~ISplitter(){}class BinarySplitter :public ISplitter{public :virtual ISplitter* clone () return new BinarySplitter(*this ); class TxtSplitter :public ISplitter{public :virtual ISplitter* clone () return new TxtSplitter(*this );
class MainForm :public Form {public :this ->prototype=prototype;void Button_Click ()
当一个系统应该独立于它的产品创建、构成和表示时,要使用
Prototype模式。当一个类的实例只能有几个不同状态组合中的一种时。建立相应数目的原型并克隆它们
可能比每次用合适的状态手工实例化该类更方便一些。
抽象代码结构 1 2 3 4 5 6 7 8 9 10 11 12 13 14 15 16 17 18 19 20 21 22 23 24 25 26 27 28 29 30 31 32 33 34 35 36 37 38 39 40 41 42 43 44 45 46 47 48 49 50 51 52 53 54 55 56 57 58 59 60 61 62 63 64 65 66 67 68 69 70 71 72 73 74 75 76 77 78 79 80 81 82 83 84 85 86 87 88 89 90 91 92 93 94 95 96 97 98 99 100 101 102 103 104 105 106 #include <iostream> #include <string> class Prototype { public :virtual ~Prototype() {}virtual Prototype* clone () 0 ;virtual std ::string type () 0 ;class ConcretePrototypeA :public Prototypepublic :Prototype* clone () {return new ConcretePrototypeA();std ::string type () {return "type A" ;class ConcretePrototypeB :public Prototypepublic :Prototype* clone () {return new ConcretePrototypeB();std ::string type () {return "type B" ;class Client { public :static void init () {0 ] = new ConcretePrototypeA();1 ] = new ConcretePrototypeB();static void remove () {delete types[ 0 ];delete types[ 1 ];static Prototype* make ( const int index ) {if ( index >= n_types )return nullptr ;return types[ index ]->clone();private :static Prototype* types[ 2 ]; static int n_types;Client ::types[ 2 ]; int Client ::n_types = 2 ;int main () Client ::init();Client ::make( 0 );std ::cout << "Prototype: " << prototype1->type() << std ::endl ;delete prototype1;Client ::make( 1 );std ::cout << "Prototype: " << prototype2->type() << std ::endl ;delete prototype2;Client ::remove ();return 0 ;
Builder 在软件系统中,有时候面临着“一个复杂对象”的创建工作,它的创建过程是一套固定的组合方法,和多个不同的被组合的子对象。
Builder将一个复杂对象的构建与其表示相分离,使得同样的构建过程(稳定)可以创建不同的表示(变化)。
这个类似Template
Method,不过Builder是针对对象的创建来进行设计的。
示例4 实现一个程序,可以创建出不同种类的房子图像。
1 2 3 4 5 6 7 8 9 10 11 12 13 14 15 16 17 18 19 20 21 22 23 24 25 26 27 28 29 30 31 32 33 34 35 36 37 38 class House {class HouseBuilder {public :House* GetResult () { return pHouse; }virtual ~HouseBuilder(){}protected :virtual void BuildPart1 () 0 ;virtual void BuildPart2 () 0 ;virtual void BuildPart3 () 0 ;virtual void BuildPart4 () 0 ;virtual void BuildPart5 () 0 ;class HouseDirector {public :this ->pHouseBuilder=pHouseBuilder;House* Construct () {for (int i = 0 ; i < 4 ; i++){bool flag=pHouseBuilder->BuildPart3();if (flag){ pHouseBuilder->BuildPart4(); }return pHouseBuilder->GetResult();
class StoneHouse :public House{...};class StoneHouseBuilder :public HouseBuilder{protected :virtual void BuildPart1 () virtual void BuildPart2 () virtual void BuildPart3 () virtual void BuildPart4 () virtual void BuildPart5 ()
这样如果有其它种类的House,可以新创建House和HouseBuilder的子类即可。
Builder
模式主要用于“分步骤构建一个复杂的对象”。在这其中“分步骤”是一个稳定的算法,而复杂对象的各个部分则经常变化。
变化点在哪里,封装哪里——
Builder模式主要在于应对“复杂对象各个部分”的频繁需求变动。
抽象代码结构 1 2 3 4 5 6 7 8 9 10 11 12 13 14 15 16 17 18 19 20 21 22 23 24 25 26 27 28 29 30 31 32 33 34 35 36 37 38 39 40 41 42 43 44 45 46 47 48 49 50 51 52 53 54 55 56 57 58 59 60 61 62 63 64 65 66 67 68 69 70 71 72 73 74 75 76 77 78 79 80 81 82 83 84 85 86 87 88 89 90 91 92 93 94 95 96 97 98 99 100 101 102 103 104 105 106 107 108 109 110 111 112 113 114 115 116 117 118 119 120 121 122 123 124 125 126 127 128 129 130 131 132 133 134 135 136 137 138 139 140 141 142 143 144 145 146 147 148 149 150 151 152 153 154 155 156 157 158 159 #include <iostream> #include <string> class Product { public :void makeA ( const std ::string &part ) {void makeB ( const std ::string &part ) {void makeC ( const std ::string &part ) {std ::string get () {return (partA + " " + partB + " " + partC);private :std ::string partA;std ::string partB;std ::string partC;class Builder { public :virtual ~Builder() {}Product get () {return product;virtual void buildPartA () 0 ;virtual void buildPartB () 0 ;virtual void buildPartC () 0 ;protected :class ConcreteBuilderX :public Builderpublic :void buildPartA () {"A-X" );void buildPartB () {"B-X" );void buildPartC () {"C-X" );class ConcreteBuilderY :public Builderpublic :void buildPartA () {"A-Y" );void buildPartB () {"B-Y" );void buildPartC () {"C-Y" );class Director {public :if ( builder )delete builder;void set ( Builder *b ) {if ( builder )delete builder;Product get () {return builder->get ();void construct () {private :int main () set ( new ConcreteBuilderX );get ();std ::cout << "1st product parts: " << product1.get () << std ::endl ;set ( new ConcreteBuilderY );get ();std ::cout << "2nd product parts: " << product2.get () << std ::endl ;return 0 ;
对象性能相关模式 处理面向对象编程所产生的额外代价,比如太多的对象创建的资源消耗等问题。
典型模式:
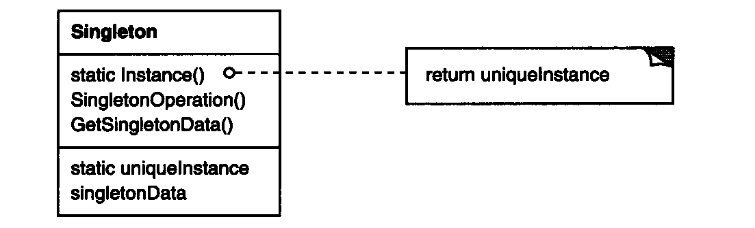
Singleton 处理一个类,只允许一个实例存在,或者只需要存在一个对象即可。
Singleton保证一个类仅有一个实例,并提供一个访问它的全局访问点。
示例5 单线程环境下实现
1 2 3 4 5 6 7 8 9 10 11 12 13 14 15 16 17 18 class Singleton {private :static Singleton* m_instance;const Singleton& other);public :static Singleton* getInstance () nullptr ;Singleton* Singleton::getInstance () {if (m_instance == nullptr ) {new Singleton();return m_instance;
版本二,代价过高(相对而言)
Singleton* Singleton::getInstance () {if (m_instance == nullptr ) {new Singleton();return m_instance;
双检查,第一个判断保证读变量不会获取锁。第二个判断,保证当两个或多个线程都进入了第一个判断内,不会创建多个对象。
Singleton* Singleton::getInstance () {if (m_instance==nullptr ){if (m_instance == nullptr ) {new Singleton();return m_instance;
但是,m_instance = new Singleton()
在cpu指令执行的时候,可能会出现指令reorder的情况。因为编译器会对汇编代码进行优化。比如,指令顺序为(分配内存--调用构造器--将对象赋值到变量内存),可能变成(分配内存--将对象赋值到变量内存--调用构造器)。
因此,当指令执行顺序是(分配内存--将对象赋值到变量内存--调用构造器)时,线程1可能处在(分配内存--将对象赋值到变量内存)阶段,此时
m_instance != nullptr。如果此时线程2,开始第一个判断,会直接跳转到
return m_instance,但是 m_instance
并没有调用构造器,并不是一个可用的对象。问题就出现了。
C++ 11版本之后的跨平台实现双检查:
1 2 3 4 5 6 7 8 9 10 11 12 13 14 15 16 17 18 std ::atomic<Singleton*> Singleton::m_instance;std ::mutex Singleton::m_mutex;Singleton* Singleton::getInstance () {std ::memory_order_relaxed);std ::atomic_thread_fence(std ::memory_order_acquire);if (tmp == nullptr ) {std ::lock_guard<std ::mutex> lock (m_mutex) std ::memory_order_relaxed);if (tmp == nullptr ) {new Singleton;std ::atomic_thread_fence(std ::memory_order_release);std ::memory_order_relaxed);return tmp;
Singleton的构造器可以设置为protected,允许子类派生。一般不要支持拷贝构造函数,或者clone接口。
抽象代码结构 单线程版
1 2 3 4 5 6 7 8 9 10 11 12 13 14 15 16 17 18 19 20 21 22 23 24 25 26 27 28 29 30 31 32 33 34 35 36 37 38 39 40 41 42 43 44 45 46 47 48 49 50 51 52 53 54 55 56 57 58 59 #include <iostream> class Singleton { public :const & ) = delete ;operator =( Singleton const & ) = delete ;static Singleton* get () {if ( !instance )new Singleton();return instance;static void restart () {if ( instance )delete instance;void tell () {std ::cout << "This is Singleton." << std ::endl ;private :static Singleton *instance;nullptr ;int main () get ()->tell();return 0 ;
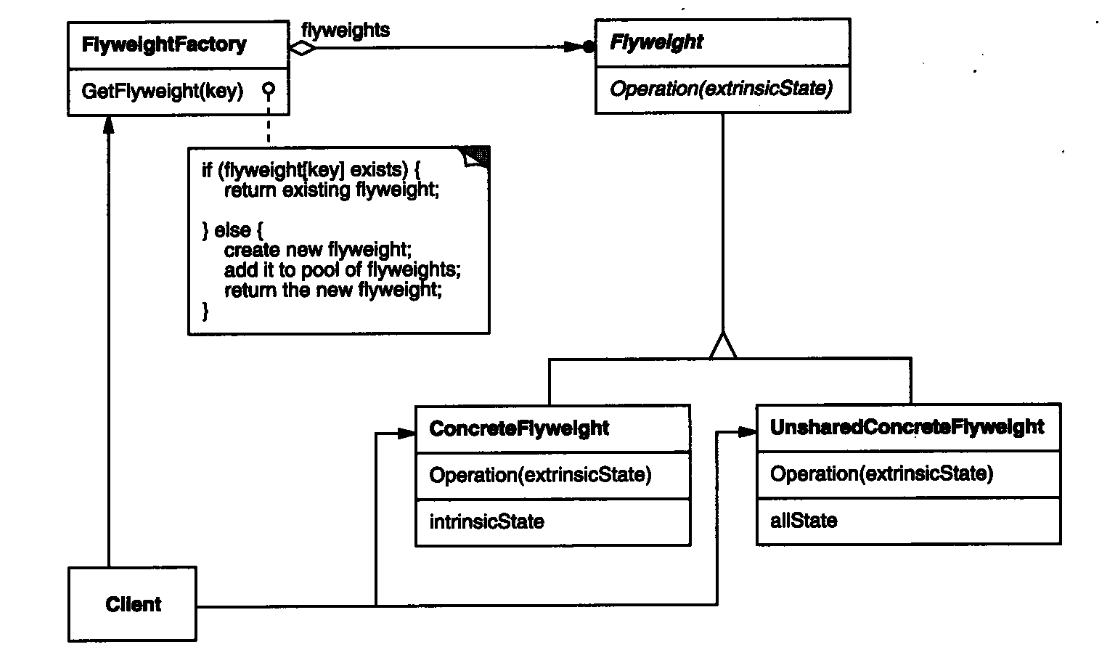
Flyweight 对于大量存在的对象,会产生较高的内存上代价。
Flyweight(享元)运用共享技术有效地支持大量细粒度的对象。
原理就是将对象以一个全局唯一key,储存在一个对象记录数据结构中。当下一次使用同一对象,直接查找记录,返回已经存在的对象。
示例6 实现能够显示每种字体属性的程序。
1 2 3 4 5 6 7 8 9 10 11 12 13 14 15 16 17 18 19 20 21 22 23 24 25 26 27 28 29 30 31 32 33 34 class Font {private :string key;public :const string & key){...}class FontFactory {private :map <string ,Font* > fontPool;public :Font* GetFont (const string & key) {map <string ,Font*>::iterator item=fontPool.find (key);if (item!=footPool.end ()){return fontPool[key];else {new Font(key);return font;void clear ()
享元,在对象数量很多,并且因此造成性能负担的时候,可以考虑使用。
抽象代码结构 1 2 3 4 5 6 7 8 9 10 11 12 13 14 15 16 17 18 19 20 21 22 23 24 25 26 27 28 29 30 31 32 33 34 35 36 37 38 39 40 41 42 43 44 45 46 47 48 49 50 51 52 53 54 55 56 57 58 59 60 61 62 63 64 65 66 67 68 69 70 71 72 73 74 75 76 77 78 79 80 81 82 83 84 85 86 87 88 89 90 91 92 93 94 95 96 97 98 99 100 101 102 103 104 105 106 #include <iostream> #include <map> class Flyweight { public :virtual ~Flyweight() {}virtual void operation () 0 ;class UnsharedConcreteFlyweight :public Flyweightpublic :const int intrinsic_state ) :void operation () {std ::cout << "Unshared Flyweight with state " << state << std ::endl ;private :int state;class ConcreteFlyweight :public Flyweightpublic :const int all_state ) :void operation () {std ::cout << "Concrete Flyweight with state " << state << std ::endl ;private :int state;class FlyweightFactory { public :for ( auto it = flies.begin (); it != flies.end (); it++ )delete it->second;clear ();Flyweight *getFlyweight ( const int key ) {if ( flies.find ( key ) != flies.end () )return flies[ key ];new ConcreteFlyweight( key );std ::pair<int , Flyweight *>( key, fly ) );return fly;private :std ::map <int , Flyweight*> flies;int main () new FlyweightFactory;1 )->operation();2 )->operation();delete factory;return 0 ;
接口隔离相关模式 在软件构建过程中,某些接口之间的“直接”依赖可能会带来很多问题,甚至无法实现。这时候,往往采用添加一层“间接”的稳定接口层,来实现间接的依赖。
间接的中间层思想,很常见,比如指针就是一种间接层,操作系统是用户程序和机器硬件之间的中间层。
典型模式:
Facade (c不是英文字符,整个词是个法文,不过这不重要)
Proxy
Adapter
Mediator
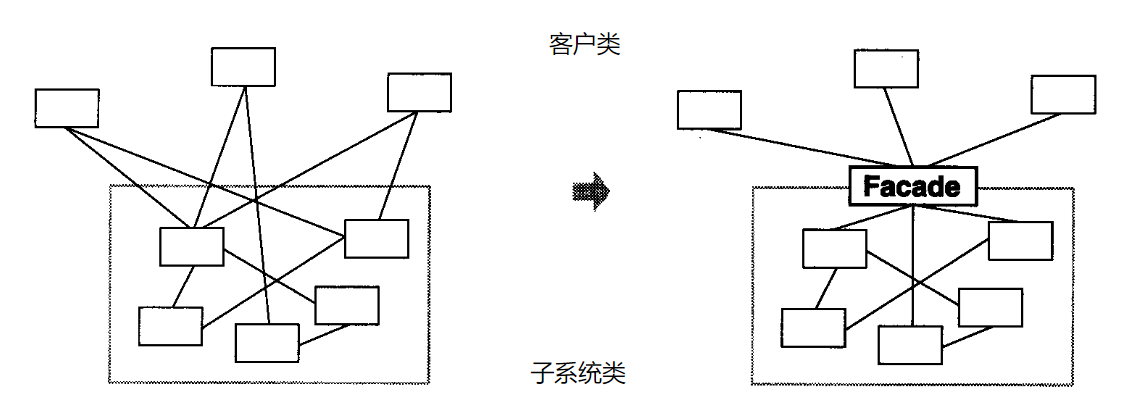
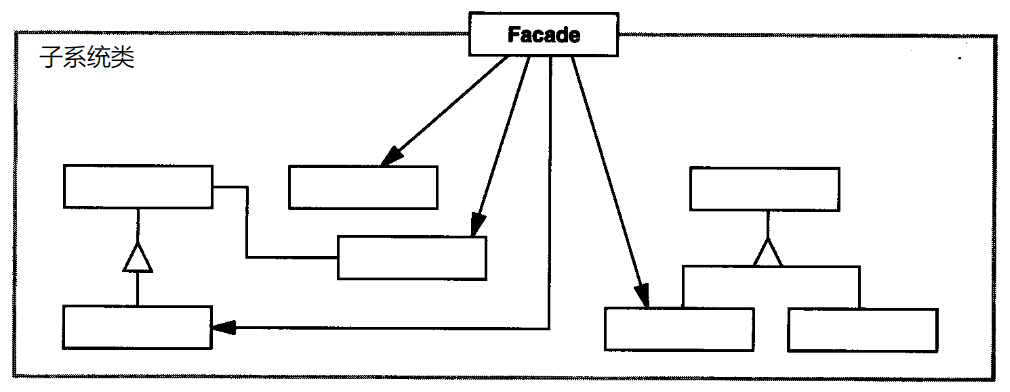
Facade 为子系统中的一组接口提供一个一致的界面,
Facade模式定义了一个高层接口,这个接口使得这一子系统更加容易使用。
目标效果如图:
Facade模式更注重架构层次,偏向架构设计的模式。实现了内部组件和外部客户程序的解耦。其内部组件一般是相互依赖的一系列类型。
Facade模式为一个复杂子系统提供一个简单接口时。子系统往往因为不断演化而变得越来越复杂。
抽象代码结构 1 2 3 4 5 6 7 8 9 10 11 12 13 14 15 16 17 18 19 20 21 22 23 24 25 26 27 28 29 30 31 32 33 34 35 36 37 38 39 40 41 42 43 44 45 46 47 48 49 50 51 52 53 54 55 56 57 58 59 60 61 62 63 64 65 66 67 68 69 70 71 72 73 74 75 76 77 78 79 80 81 82 #include <iostream> class SubsystemA { public :void suboperation () {std ::cout << "Subsystem A method" << std ::endl ;class SubsystemB { public :void suboperation () {std ::cout << "Subsystem B method" << std ::endl ;class SubsystemC { public :void suboperation () {std ::cout << "Subsystem C method" << std ::endl ;class Facade { public :void operation1 () {void operation2 () {private :int main () new Facade();delete facade;return 0 ;
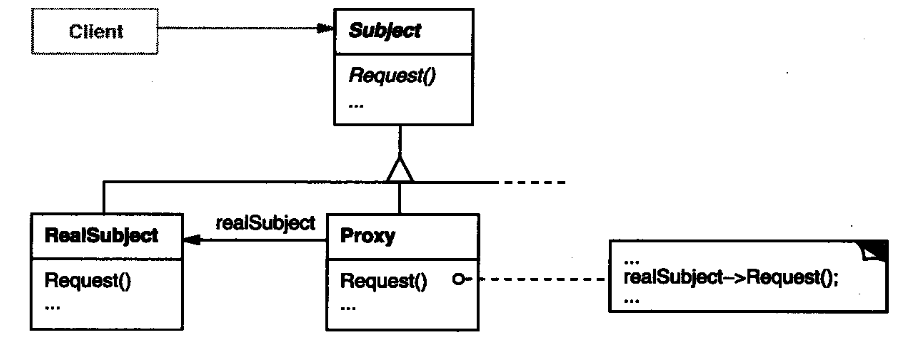
Proxy 在面向对象的系统中,有些对象可能由于,对象创建开销很大、需要额外安全控制、需要进程外的访问操作等,直接访问对象会麻烦。
比如说,加载一个word文档,如果有很多图片,肯定不会希望在打开文件时就完成对所有图片的加载工作,那样会很慢。这时候,可以转化为加载一个图片的proxy代理,当浏览到该图片是,再通过proxy加载相应图片。
Proxy为其他对象提供一种代理以控制对这个对象的访问。
通常Proxy会保持原对象的接口,这个被叫做“透明操作”。但是也不一定完全保持原对象接口。
Proxy可能会作用于一个对象,也可能作用于一个大的系统,实现起来可能会很复杂。
另一个使用场景是对用户隐藏另一种称之为
copy-on-write的优化方式,该优化与根据需要创建对象有关。拷贝一个庞大而复杂的对象是一种开销很大的操作,如果这个拷贝根本没有被修改,那么这些开销就没有必要。用代理延迟这一拷贝过程,我们可以保证只有当这个对象被修改的时候才对它进行拷贝。
在实现
Copy-on-write时必须对实体进行引用计数。拷贝代理仅会增加引用计数。只有当用户请求一个修改该实体的操作时,代理才会真正的拷贝它。在这种情况下,代理还必须减少实体的引用计数。当引用的数目为零时,这个实体将被删除。
Copy-on-Write可以大幅度的降低拷贝庞大实体时的开销。
下面是一些可以使用 Proxy模式常见情况:
远程代理(Remote
Proxy)为一个对象在不同的地址空间提供局部代表。
虚代理(Virtual Proxy)根据需要创建开销很大的对象。
保护代理(Protection
Proxy)控制对原始对象的访问。保护代理用于对象应该有不同的访问权限的时候。
智能指引 (Smart
Reference)取代了简单的指针,它在访问对象时执行一些附加操作。它的典型用途包括:
对指向实际对象的引用计数,这样当该对象没有引用时,可以自动释放它
(也称为 Smart Pointers )。
当第一次引用一个持久对象时,将它装入内存。
在访问一个实际对象前,检查是否已经锁定了它,以确保其他对象不能改变它。
抽象代码结构 1 2 3 4 5 6 7 8 9 10 11 12 13 14 15 16 17 18 19 20 21 22 23 24 25 26 27 28 29 30 31 32 33 34 35 36 37 38 39 40 41 42 43 44 45 46 47 48 49 50 51 52 53 54 55 56 57 58 59 60 61 62 63 64 65 66 #include <iostream> class Subject { public :virtual ~Subject() { }virtual void request () 0 ;class RealSubject :public Subjectpublic :void request () {std ::cout << "Real Subject request" << std ::endl ;class Proxy :public Subjectpublic :new RealSubject();delete subject;void request () {private :int main () new Proxy();delete proxy;return 0 ;
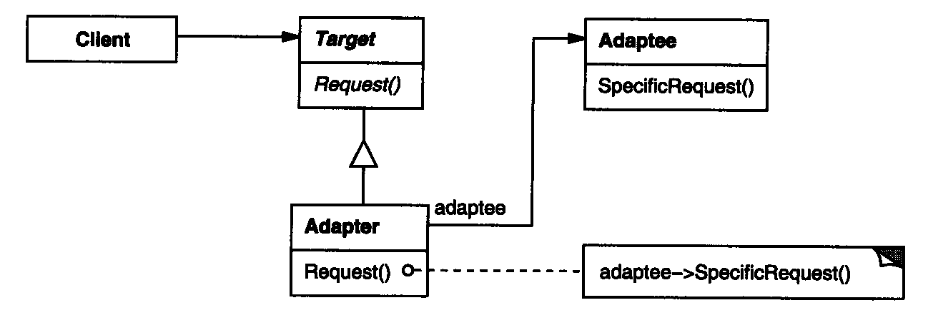
Adapter 在软件系统中,有时会需要将 一些现有的对象
放在新的环境中使用。但是此时的接口发生了变化。
Adapter将一个类的接口转换成客户希望的另外一个接口。
Adapter模式使得原本由于接口不兼容而不能一起工作的那些类可以一起工作。也被称为Wrapper。
模式表达如下:
Adapter继承Target保持了形同接口,同时组合了一个Adaptee对象,可以调用Adaptee的方法。
抽象代码结构 使用多继承的方式,类adapter。但是依然推荐组合而不是继承。
1 2 3 4 5 6 7 8 9 10 11 12 13 14 15 16 17 18 19 20 21 22 23 24 25 26 27 28 29 30 31 32 33 34 35 36 37 38 39 40 41 42 43 44 45 46 47 48 49 50 51 52 53 54 55 56 57 58 59 60 61 62 63 64 65 66 67 #include <iostream> class Target { public :virtual ~Target() {}virtual void request () 0 ;class Adaptee { public :void specificRequest () {std ::cout << "specific request" << std ::endl ;class Adapter :public Targetpublic :delete adaptee;void request () {private :int main () new Adapter();delete t;return 0 ;
使用组合对象,对象adapter
1 2 3 4 5 6 7 8 9 10 11 12 13 14 15 16 17 18 19 20 21 22 23 24 25 26 27 28 29 30 31 32 33 34 35 36 37 38 39 40 41 42 43 44 45 46 47 48 49 50 51 52 53 54 55 56 57 #include <iostream> class Target { public :virtual ~Target() {}virtual void request () 0 ;class Adaptee { public :void specificRequest () {std ::cout << "specific request" << std ::endl ;class Adapter :public Target, private Adapteepublic :virtual void request () {int main () new Adapter();delete t;return 0 ;
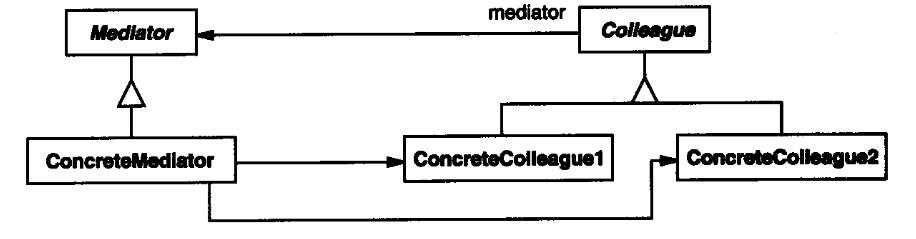
Mediator 处理多个对象相互关联,并且其引用关系复杂,使得改变变得不那么容易。
Mediator用一个中介对象来封装一系列的对象交互。中介者使各对象不需要显式地相互引用,从而使其耦合松散,而且可以独立地改变它们之间的交互。
和Facade很相似,但是Mediator是作用于内部对象之间的,双向的关系。Facade是解耦内部对象和外部环境的,单向的关系。
图中忽略了Mediator与Colleagu之间的通信实现,这个往往是复杂的。其中可以用到Observer模式,来自动检测不同对象间的通信转换。
Mediator中有Colleague的指针成员,Colleague中有Mediator的指针成员。方便两者之间的相互调用。
抽象代码结构 1 2 3 4 5 6 7 8 9 10 11 12 13 14 15 16 17 18 19 20 21 22 23 24 25 26 27 28 29 30 31 32 33 34 35 36 37 38 39 40 41 42 43 44 45 46 47 48 49 50 51 52 53 54 55 56 57 58 59 60 61 62 63 64 65 66 67 68 69 70 71 72 73 74 75 76 77 78 79 80 81 82 83 84 85 86 87 88 89 90 91 92 93 94 95 96 97 98 99 100 101 102 103 104 105 106 107 108 109 110 111 112 113 114 115 116 117 118 119 120 121 122 123 124 125 126 #include <iostream> #include <vector> #include <string> class Mediator ;class Colleague { public :const m, const unsigned int i ) : virtual ~Colleague() {}unsigned int getID () {return id;virtual void send ( std ::string ) 0 ;virtual void receive ( std ::string ) 0 ;protected :unsigned int id;class ConcreteColleague :public Colleaguepublic :const m, const unsigned int i ) : void send ( std ::string msg ) void receive ( std ::string msg ) {std ::cout << "Message '" << msg << "' received by Colleague " << id << std ::endl ;class Mediator { public :virtual ~Mediator() {}virtual void add ( Colleague* const c ) 0 ;virtual void distribute ( Colleague* const sender, std ::string msg ) 0 ;protected :class ConcreteMediator :public Mediatorpublic :for ( unsigned int i = 0 ; i < colleagues.size (); i++ )delete colleagues[ i ];clear ();void add ( Colleague* const c ) {void distribute ( Colleague* const sender, std ::string msg ) {for ( unsigned int i = 0 ; i < colleagues.size (); i++ )if ( colleagues.at( i )->getID() != sender->getID() )private :std ::vector <Colleague*> colleagues;void ConcreteColleague::send ( std ::string msg ) std ::cout << "Message '" << msg << "' sent by Colleague " << id << std ::endl ;this , msg );int main () new ConcreteMediator();new ConcreteColleague( mediator, 1 );new ConcreteColleague( mediator, 2 );new ConcreteColleague( mediator, 3 );"Hi!" );"Hello!" );delete mediator;return 0 ;
状态变化相关模式 关注对象状态的改变,对这些
变化的状态进行管理,维持更高层模块的稳定。
典型模式:
State
Memento
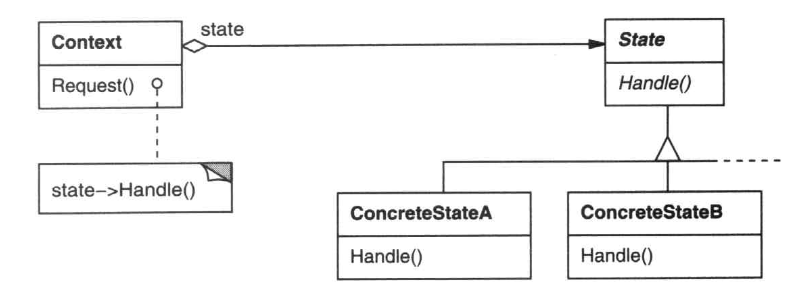
State 某些对象的状态如果发生改变,那么它的行为也会发生改变。比如文件的读写状态变化。
State模式允许一个对象在其内部状态改变时改变它的行为。对象看起来似乎修改了它的类。
类似Strategy模式,但是这里关注状态的变化。
示例1 实现对网络连接状态的跟踪和处理。
实现一,使用条件判断,处理和转换状态。
1 2 3 4 5 6 7 8 9 10 11 12 13 14 15 16 17 18 19 20 21 22 enum NetworkState {class NetworkProcessor {public :void Operation () if (state == Network_Open){else if (state == Network_Close){else if (state == Network_Connect){
实现二,抽象出状态对象,状态对象自己处理自己的转换关系。
1 2 3 4 5 6 7 8 9 10 11 12 13 14 15 16 17 18 19 20 21 22 23 24 25 26 27 28 29 30 31 32 33 34 35 36 37 38 39 40 41 42 43 class NetworkState {public :virtual void Operation1 () 0 ;virtual void Operation2 () 0 ;virtual void Operation3 () 0 ;virtual ~NetworkState(){}class OpenState :public NetworkState{static NetworkState* m_instance;public :static NetworkState* getInstance () if (m_instance == nullptr ) {new OpenState();return m_instance;void Operation1 () void Operation2 () void Operation3 () class CloseState :public NetworkState{ ... }
1 2 3 4 5 6 7 8 9 10 11 12 13 14 15 16 17 18 19 20 21 22 23 24 25 class NetworkProcessor {public :this ->pState = pState;void Operation1 () void Operation2 () void Operation3 ()
State模式将状态的改变,实现为状态对象的改变,通过抽象基类,不再依赖具体对象。而且,状态的转换更加明确,不易出错。
抽象代码结构 1 2 3 4 5 6 7 8 9 10 11 12 13 14 15 16 17 18 19 20 21 22 23 24 25 26 27 28 29 30 31 32 33 34 35 36 37 38 39 40 41 42 43 44 45 46 47 48 49 50 51 52 53 54 55 56 57 58 59 60 61 62 63 64 65 66 67 68 69 70 71 72 73 74 75 76 77 78 79 80 81 82 83 84 85 86 87 88 89 90 91 92 #include <iostream> class State { public :virtual ~State() { }virtual void handle () 0 ;class ConcreteStateA :public Statepublic :void handle () {std ::cout << "State A handled." << std ::endl ;class ConcreteStateB :public Statepublic :void handle () {std ::cout << "State B handled." << std ::endl ;class Context { public :delete state;void setState ( State* const s ) {if ( state )delete state;void request () {private :int main () new Context();new ConcreteStateA() );new ConcreteStateB() );delete context;return 0 ;
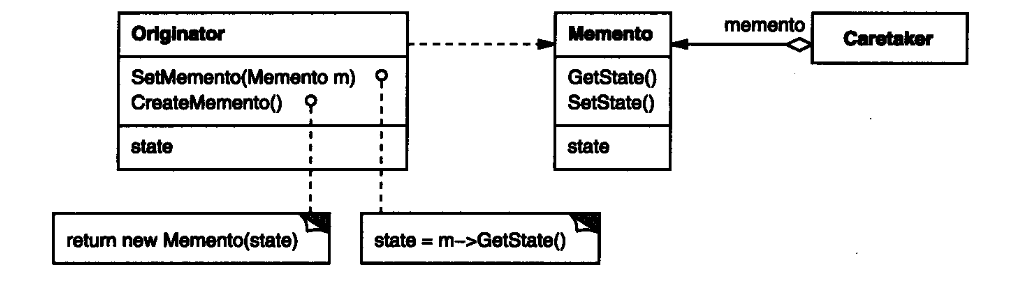
Memento 当一个对象,需要保存一个或者多个内存快照,用于未来恢复到当前对象状态。这时,会出现一个潜在问题,对象的实现细节可能会暴露。
Memento的想法,就是找另一个封闭的对象B,保存当前对象A的状态,并在需要的时候用于恢复对象A的状态。
Memento在不破坏封装性的前提下,捕获一个对象的内部状态,并在该对象之外保存这个状态。这样以后就可将该对象恢复到原先保存的状态。
这个模式就是为了隐藏对象信息,而不是显示地将一个一个成员变量导出保存。
但是,这个模式实现地内存快照方法,已经过时了,现在往往会采用效率更高、更简洁地序列化方法来实现。
抽象代码实现 1 2 3 4 5 6 7 8 9 10 11 12 13 14 15 16 17 18 19 20 21 22 23 24 25 26 27 28 29 30 31 32 33 34 35 36 37 38 39 40 41 42 43 44 45 46 47 48 49 50 51 52 53 54 55 56 57 58 59 60 61 62 63 64 65 66 67 68 69 70 71 72 73 74 75 76 77 78 79 80 81 82 83 84 85 86 87 88 89 90 91 92 93 94 95 96 97 98 99 100 101 102 103 104 105 106 107 108 109 110 111 112 113 114 115 116 117 118 119 120 121 122 123 124 125 126 127 128 129 130 131 132 133 134 135 136 137 #include <iostream> #include <vector> class Memento { private :friend class Originator ;const int s ) : state( s ) {}void setState ( const int s ) {int getState () {return state;private :int state;class Originator { public :void setState ( const int s ) {std ::cout << "Set state to " << s << "." << std ::endl ;int getState () {return state;void setMemento ( Memento* const m ) {Memento *createMemento () {return new Memento( state );private :int state;class CareTaker { public :const o ) : originator( o ) {}for ( unsigned int i = 0 ; i < history.size (); i++ )delete history.at( i );clear ();void save () {std ::cout << "Save state." << std ::endl ;void undo () {if ( history.empty() )std ::cout << "Unable to undo state." << std ::endl ;return ;std ::cout << "Undo state." << std ::endl ;delete m;private :std ::vector <Memento*> history;int main () new Originator();new CareTaker( originator );1 );2 );3 );std ::cout << "Actual state is " << originator->getState() << "." << std ::endl ;delete originator;delete caretaker;return 0 ;
数据结构相关模式 假如存在一些数据结构,如果让客户程序直接依赖它们,会破坏组件的复用性。比如说接口的不统一,导致源代码需要频繁改变。
这时候,对这些数据结构进行封装,对外提供统一的接口,来实现与数据结构无关的访问。
典型模式:
Composite
Iterator
Chain of Responsibility
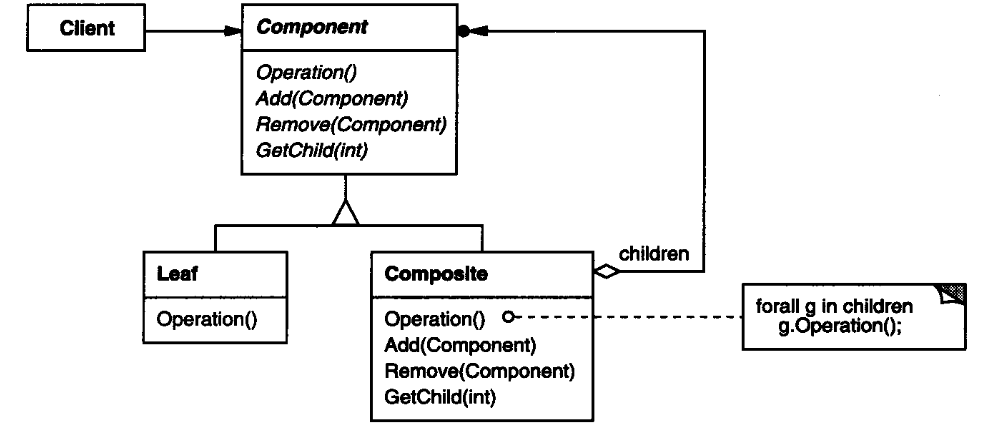
Composite 处理对内部数据结构复杂实现的依赖,Composite将对象组合成树形结构以表示“部分-整体”的层次结构。
Composite使得用户对单个对象和组合对象的使用具有一致性。
抽象代码结构 1 2 3 4 5 6 7 8 9 10 11 12 13 14 15 16 17 18 19 20 21 22 23 24 25 26 27 28 29 30 31 32 33 34 35 36 37 38 39 40 41 42 43 44 45 46 47 48 49 50 51 52 53 54 55 56 57 58 59 60 61 62 63 64 65 66 67 68 69 70 71 72 73 74 75 76 77 78 79 80 81 82 83 84 85 86 87 88 89 90 91 92 93 94 95 96 97 98 99 100 101 102 103 104 105 #include <iostream> #include <vector> class Component { public :virtual ~Component() {}virtual Component *getChild ( int ) {return 0 ;virtual void add ( Component * ) virtual void remove ( int ) virtual void operation () 0 ;class Composite :public Componentpublic :for ( unsigned int i = 0 ; i < children.size (); i++ )delete children[ i ];Component *getChild ( const unsigned int index ) {return children[ index ];void add ( Component *component ) {void remove ( const unsigned int index ) {begin () + index );delete child;void operation () {for ( unsigned int i = 0 ; i < children.size (); i++ )private :std ::vector <Component*> children;class Leaf :public Componentpublic :const int i ) : id( i ) {}void operation () {std ::cout << "Leaf " << id <<" operation" << std ::endl ;private :int id;int main () for ( unsigned int i = 0 ; i < 5 ; i++ )new Leaf( i ) );remove ( 0 );return 0 ;
Composite的operation()中处理到了Composite类型对象,会继续处理其children。
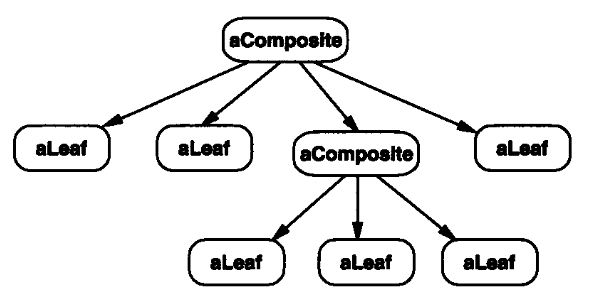
典型的 Composite对象结构如下图:
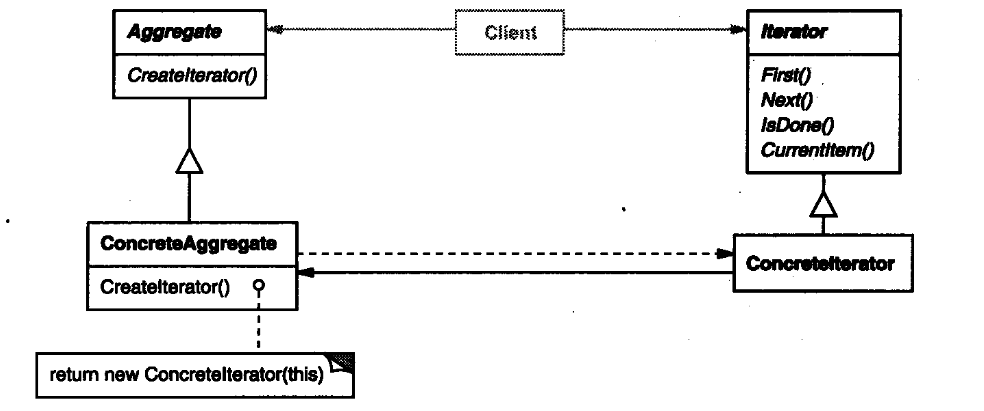
Iterator 不管内部的数据结构如何定义,Iterator使用统一接口,隐藏内部实现,供外部使用各种数据结构。
Iterator提供一种方法顺序访问一个聚合对象中各个元素 ,
而又不需暴露该对象的内部表示。
这个模式在C++中,并不是实现目的的最优选择。STL中泛型编程实现的Iterator比面向对象设计模式实现的Iterator,更高效。
抽象代码结构 1 2 3 4 5 6 7 8 9 10 11 12 13 14 15 16 17 18 19 20 21 22 23 24 25 26 27 28 29 30 31 32 33 34 35 36 37 38 39 40 41 42 43 44 45 46 47 48 49 50 51 52 53 54 55 56 57 58 59 60 61 62 63 64 65 66 67 68 69 70 71 72 73 74 75 76 77 78 79 80 81 82 83 84 85 86 87 88 89 90 91 92 93 94 95 96 97 98 99 100 101 102 103 104 105 106 107 108 109 110 111 112 113 114 115 116 117 118 119 120 121 122 123 124 125 126 127 128 129 130 131 132 133 134 135 136 137 138 139 140 141 #include <iostream> #include <stdexcept> #include <vector> class Iterator ;class ConcreteAggregate ;class Aggregate { public :virtual ~Aggregate() {}virtual Iterator *createIterator () 0 ;class ConcreteAggregate :public Aggregatepublic :const unsigned int size )list = new int [size ]();size ;delete [] list ;Iterator *createIterator () ;unsigned int size () const {return count;int at ( unsigned int index ) {return list [ index ];private :int *list ;unsigned int count;class Iterator { public :virtual ~Iterator() { }virtual void first () 0 ;virtual void next () 0 ;virtual bool isDone () const 0 ;virtual int currentItem () const 0 ;class ConcreteIterator :public Iteratorpublic :list ( l ), index( 0 ) {}void first () {0 ;void next () {bool isDone () const {return ( index >= list ->size () );int currentItem () const {if ( isDone() )return -1 ;return list ->at(index);private :list ;unsigned int index;Iterator *ConcreteAggregate::createIterator () return new ConcreteIterator( this );int main () unsigned int size = 5 ;list = ConcreteAggregate( size );list .createIterator();for ( ; !it->isDone(); it->next())std ::cout << "Item value: " << it->currentItem() << std ::endl ;delete it;return 0 ;
面向对象的Iterator,相比STL的Iterator,其代价在于ConcreteIterator这种子类调用虚函数的代价。
这种通过虚函数实现多态调用的方法,是运行时多态。
STL通过模板支持不同的数据结构,是编译时多态,由编译器直接推断出具体类型。显然,就程序运行时效率而言,泛型编程的方式效率会更高。
然而在一些不支持泛型编程的语言种,Iterator设计模式还是有应用的。
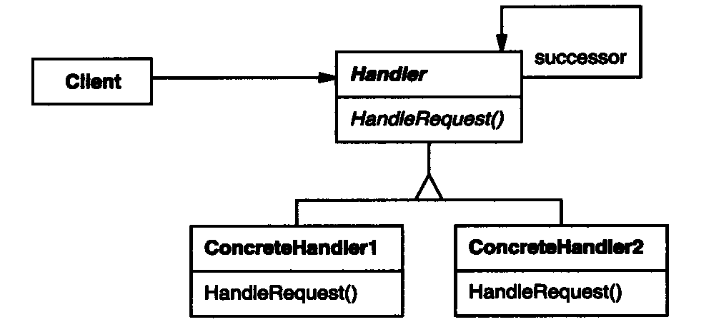
Chain of Responsibility 当一个请求可以被多个对象处理,但是每次仅会有一个对象完成处理操作,此时,如果显示的一种情况一种情况地去指定处理对象,那么实现会很复杂。
Chain of
Responsibility使多个对象都有机会处理请求,从而避免请求的发送者和接收者之间的耦合关系。将这些对象连成一条链,并沿着这条链传递该请求,直到有一个对象处理它为止。
一个链表中所有对象,依次处理一个请求。最后没有被处理的请求,应当设置默认的响应机制。
抽象代码结构 1 2 3 4 5 6 7 8 9 10 11 12 13 14 15 16 17 18 19 20 21 22 23 24 25 26 27 28 29 30 31 32 33 34 35 36 37 38 39 40 41 42 43 44 45 46 47 48 49 50 51 52 53 54 55 56 57 58 59 60 61 62 63 64 65 66 67 68 69 70 71 72 73 74 75 76 77 78 79 80 81 82 83 84 85 86 87 88 89 90 91 92 93 94 95 96 97 98 99 100 101 102 #include <iostream> class Handler { public :virtual ~Handler() {}virtual void setHandler ( Handler *s ) {virtual void handleRequest () {if (successor != 0 )private :class ConcreteHandler1 :public Handlerpublic :bool canHandle () {return false ;virtual void handleRequest () {if ( canHandle() )std ::cout << "Handled by Concrete Handler 1" << std ::endl ;else std ::cout << "Cannot be handled by Handler 1" << std ::endl ;class ConcreteHandler2 :public Handlerpublic :bool canHandle () {return true ;virtual void handleRequest () {if ( canHandle() )std ::cout << "Handled by Handler 2" << std ::endl ;else std ::cout << "Cannot be handled by Handler 2" << std ::endl ;int main () return 0 ;
行为变化相关模式 在组件构建过程中,组件行为会发生变化,并且因此导致组件不得不重新实现。行为一般就是具体的成员方法实现。
行为变化相关模式,就是将组件的行为和组件自身进行解耦。分隔出变化的行为部分。
典型模式:
Command
Visitor
Command 将行为抽象为对象,有点类似C++的函数对象。
Command模式将一个请求封装为一个对象,从而使你可用不同的请求对客户进行参数化;对请求(此时是一个可储存的对象)排队或记录请求日志,以及支持可撤消的操作。
Command模式也被称为动作( Action )或事务( Transaction )模式。
1 2 3 4 5 6 7 8 9 10 11 12 13 14 15 16 17 18 19 20 21 22 23 24 25 26 27 28 29 30 31 32 33 34 35 36 37 38 39 40 41 42 43 44 45 46 47 48 49 50 51 52 53 54 55 56 57 58 59 60 61 62 63 64 65 66 67 68 69 70 71 72 73 74 75 76 77 78 79 80 81 82 83 84 85 86 87 88 89 90 91 92 93 94 95 96 97 98 #include <iostream> class Receiver { public :void action () {std ::cout << "Receiver: execute action" << std ::endl ;class Command { public :virtual ~Command() {}virtual void execute () 0 ;protected :class ConcreteCommand :public Commandpublic :if ( receiver )delete receiver;void execute () {private :class Invoker { public :void set ( Command *c ) {void confirm () {if ( command )private :int main () ConcreteCommand command ( new Receiver() ) ;set ( &command );return 0 ;
Command模式有点类似C++的函数对象,但是两者也有明显不同。
面向对象的Command模式对于接口的定义更加规范灵活,但是性能会低一些。C++函数对象加上模板,是通过函数签名来定义接口,另外运行时性能会更高一些。
在不能使用模板和函数对象的语言中,Command模式会比较常见一些。
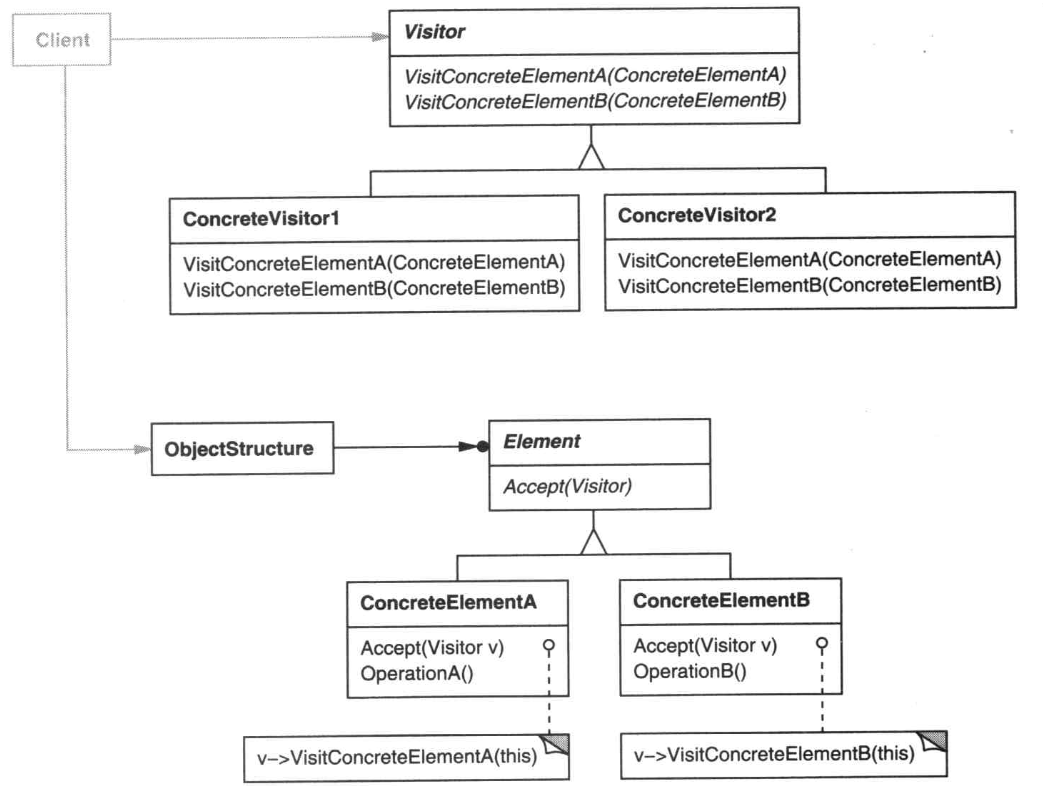
Visitor 在某些层次结构的类中,比如一个抽象父类下有多个子类,如果需要增加一个新的方法到所有子类中,直接从基类开始修改的话,无疑会很麻烦,而且不符合对修改封闭的设计原则。
Visitor模式表示一个作用于某对象结构中的各元素的操作。它使你可以在不改变各元素的类的前提下定义作用于这些元素的新操作。
使用Visitor类来修改原来的类中的方法。
比如以下代码
1 2 3 4 5 6 7 8 9 10 11 12 13 14 15 16 17 18 19 20 21 22 23 24 25 26 27 28 #include <iostream> using namespace std ;class Element { public :virtual void Func1 () 0 ;virtual void Func2 (int data) 0 ;virtual void Func3 (int data) 0 ;virtual ~Element(){}class ElementA :public Element {public :void Func1 () override void Func2 (int data) override class ElementB :public Elementpublic :void Func1 () override void Func2 (int data) override
新增方法3,需要更改所有Element类。
使用Visitor模式,结构如下:
1 2 3 4 5 6 7 8 9 10 11 12 13 14 15 16 17 18 19 20 21 22 23 24 25 26 27 28 29 30 31 32 33 34 #include <iostream> using namespace std ;class Element { public :virtual void accept (Visitor& visitor) 0 ; virtual ~Element(){}class ElementA :public Elementpublic :void accept (Visitor &visitor) override this );class ElementB :public Elementpublic :void accept (Visitor &visitor) override this ); class Visitor {public :virtual void visitElementA (ElementA& element) 0 ;virtual void visitElementB (ElementB& element) 0 ;virtual ~Visitor(){}
1 2 3 4 5 6 7 8 9 10 11 12 13 14 15 16 17 18 19 20 21 22 23 24 25 26 27 28 29 30 31 32 33 34 35 class Visitor1 :public Visitor{public :void visitElementA (ElementA& element) override cout << "Visitor1 is processing ElementA" << endl ;void visitElementB (ElementB& element) override cout << "Visitor1 is processing ElementB" << endl ;class Visitor2 :public Visitor{public :void visitElementA (ElementA& element) override cout << "Visitor2 is processing ElementA 2" << endl ;void visitElementB (ElementB& element) override cout << "Visitor2 is processing ElementB 2" << endl ;int main () return 0 ;
使用Visitor模式之后,只需要扩展新的Visitor子类,就能增加新的方法。
这个过程中,有一种被称为 double dispatch 的实现方法。第一次 dispatch
,Element类中的accept方法,辨析时哪一个扩展的Visitor子类。第二次
dispatch
,accept方法内visitor的成员方法visitElementX方法,辨析当前类是哪一种Element子类。
Visitor模式的使用有一个严格的条件,Element子类的数目必须是已知的,且不会发生变化。否则,整个过程将不再稳定,Visitor模式不如不用。
领域规则相关模式 在特定领域中,可以将变化模式抽象为一些规则,将这些规则通过设计语法实现,就能解决一般性的问题。
典型模式:
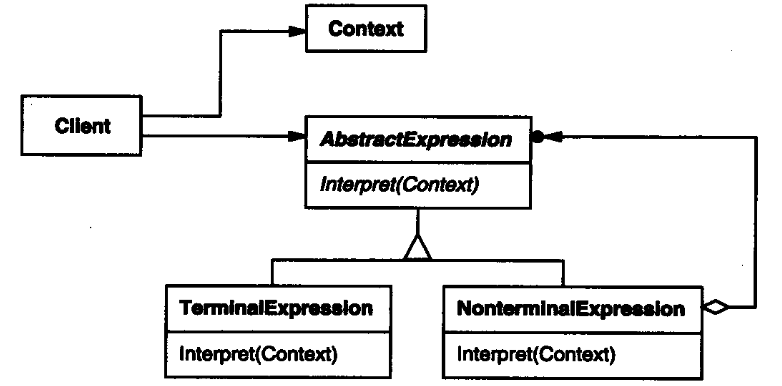
Interpreter 如果在软件构建过程中,某些结构不断地重复出现。构建一种规则,使得问题可以被表达,并通过一个解释器,来解释还原这个表达。
Interpreter模式给定一个语言,定义它的文法的一种表示,并定义一个解释器,这个解释器使用该表示来解释语言中的句子。
定义比较抽象。举例来说,实现一个加减法表达式运算,可以抽向出加法运算文法地类、减法运算文法地类等,实现一个解释器完成加减运算优先级的处理,调用不同的文法处理操作数。
抽象代码结构 1 2 3 4 5 6 7 8 9 10 11 12 13 14 15 16 17 18 19 20 21 22 23 24 25 26 27 28 29 30 31 32 33 34 35 36 37 38 39 40 41 42 43 44 45 46 47 48 49 50 51 52 53 54 55 56 57 58 59 60 61 62 63 64 65 66 67 68 69 70 71 72 73 74 75 76 77 78 79 80 81 82 83 84 85 86 87 88 89 90 91 92 93 94 95 96 97 98 99 100 101 102 103 104 105 106 107 108 109 110 111 112 113 114 115 #include <iostream> #include <map> class Context { public :void set ( const std ::string & var, const bool value) {std ::pair<std ::string , bool >( var, value ) );bool get ( const std ::string & exp ) {return vars[ exp ];private :std ::map <std ::string , bool > vars;class AbstractExpression { public :virtual ~AbstractExpression() {}virtual bool interpret ( Context* const ) {return false ;class TerminalExpression :public AbstractExpressionpublic :const std ::string & val ) : value( val ) {}bool interpret ( Context* const context ) {return context->get ( value );private :std ::string value;class NonterminalExpression :public AbstractExpressionpublic :delete lop;delete rop;bool interpret ( Context *const context ) {return lop->interpret( context ) && rop->interpret( context );private :int main () new TerminalExpression("A" );new TerminalExpression("B" );exp = new NonterminalExpression( A, B );set ( "A" , true );set ( "B" , false );std ::cout << context.get ( "A" ) << " AND " << context.get ( "B" );std ::cout << " = " << exp ->interpret( &context ) << std ::endl ;delete exp ;return 0 ;
实现这个模式挺复杂的,处理一些简单情况还行。太复杂的情况,面向对象的方式本身代价也比较大,此时可以考虑使用一些语法分析生成器标准工具。
设计模式小结 设计模式的目标是,提高复用性,管理分离变化的部分。所以,对复用性没有要求的时候,设计模式也没那么必要。
什么时候不用模式?代码可读性很差时,不用模式。需求理解不充分时,不用模式。程序中变化的部分没有显现时,不用模式。不是系统的关键依赖点的地方,不用模式。项目没有复用价值时,不用模式。项目将要发布时,不用模式。